Selections and Removing Backgrounds Selections and Removing Backgrounds
-- a Photoshop Tutorial by Janee
We do selections frequently in Photoshop and there are many ways to do them. In this tutorial we will work with some of the many different ways to handle selections, including some of the more difficult selection chores.
In this tutorial, we will do this mostly in the context of removing backgrounds from pictures. In particular, we will be using lasso, magic wand, a quickmask, a layer mask, the pen tool, and a special selection using a threshold adjustment.
If you want to select something that is a solid colour, or a few colours, you can use the magic wand. Selections with gentle curves but non-contrasted backgrounds may be best done by making a path and converting that to a selection. Some selections are most easily done by colouring on a quickmask and then touching up the selection afterwards. Some selections require a combination of these. And some selections require still other methods.
As you work through this tutorial, you will become more familiar with several methods of making selections. Among the ideas you will work with are these:
- Magic Wand
- Lasso
- Adding to Selections
- Subtracting from Selections
- Transforming a Selection
- Filling a Selection
- Moving a Selection
- Restricting movement of a Selection
- Making a Path into a Selection
- Quick Mask Mode
- Theshold adjustment
- Applying a Selection to another Layer
- Removing Matting
- Layer Masks
- Levels
|

This tutorial was written for Photoshop version 6, but it will work similarly with newer versions.
Although this tutorial was written with the beginner in mind, you may feel more comfortable with this tutorial after you have completed my Basic Shapes tutorial. Also, if you come across something that you want to read about further, this is a good time to pick up that manual.
The last section on "difficult subjects" is.. well.. difficult. If you are a beginner and planning to attempt this, be patient with yourself and try to make sense of it gradually as you go along.
Please remember, as you are doing this, I'm just giving you a glimpse of a few of the many ways there are to make selections. This is by NO means a complete treatment of selection methods. I have gotten many emails from people wanting their favorite method to be mentioned. Some of your comments are at the bottom of this tutorial. Here are a few selection methods that I do NOT cover in this tutorial:
- The marquee tools which are great for rectangular or elliptical selections, as we did in Basic Shapes.
- The polygonal lasso which is often good for hard-edged shapes with distinct corner points.
- Image -> Extract or the magnetic lasso tool are often good for high-contrast subjects. I touch on the Extract process in my Beginning Photo Restoring tutorial.
|
|
Depending upon the subject and its background, you will want to adjust your method. As you get more practice doing various selections, you will get better at deciding how to attack a particular situation. You will also discover that you just LIKE doing selections one way better than another. And that's fine too!
The goal in "deleting backgrounds" is to isolate the pixels that are not in our subject. Then we will either cover them with a mask or erase them.
We can either select the pixels of our subject and then invert the selection, or we can select the background from the start. It depends upon your image, which will be the better way. Let's get into some examples!
|
Sometimes, just erasing the background is good enough, but always make a duplicate of your layer and save your file as a layered psd before you do this. The Background Eraser is a handy tool for this sometimes. I show this in my Cutting out Hair tutorial.
Other times, the Image -> Extract function is handy. I show a brief look at this in my Beginning Photo Restoration tutorial.
|
|
|
|
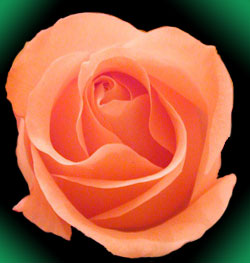
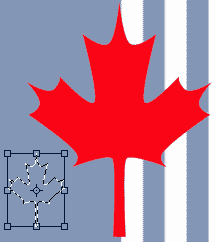
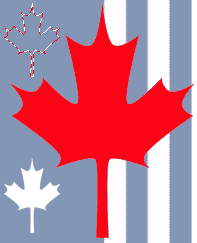
I. The Leaf.
For our first project, we are starting with the image to the right . We are going to then add little white leaves alongside this red one to get a picture like the one just below it. And we won't have to draw a thing!
Begin by right-clicking the image to the right. Choose Save as.. and put it somewhere where you will be able to find it. ;)
|

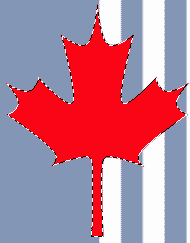
Start with this picture.
|
Then open Photoshop and open your leaf.gif. You will need this to be in RGB mode to proceed, so click Image -> Mode ... RGB.
|
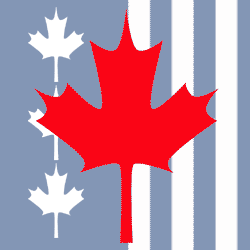
And end up with this!
|
|
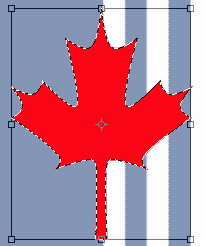
Now, let's have a look at this: The small leaves are the same shape as the big one, they are just smaller. This is a perfect job for Select -> Transform!
First we will make a selection and then mess with it a little. With this subject all one colour, we can use the magic wand tool to select the leaf.
|
 |
| Now click on Select -> Transform Selection.
Hold the shift key and drag the selection smaller. What does holding the shift key do? Try it both ways!
|
|
|
Once you get your selection the size and shape you want, hit the Enter key to lock in that selection transformation.
Now move the selection into place. To move a selection, you have to have a selection tool (any of them) chosen and put your cursor within the selected area. You see your cursor change into the little "move selection" tool.
(Note: You can't move the selection itself with the move tool. If you use the move tool, you will move whatever pixels are inside your selection. To move the selection, you use the cursor with a selection tool picked.)
If you have your selection close to where you want it, but need to just give it a nudge, with your selection tool still chosen, use your arrow keys to nudge your selection. Try this.
|
 |
| Make your foreground colour white and alt-backspace to fill your selection with white.
Now let's do that again for the top leaf.. but we don't have to make the selection again. We just have to MOVE the selection. You know how to do this.
But what if we want the second leaf to be exactly in line with the first one? The Shift key is the one that kind of keeps things in line for many of Photoshop's functions and this is no exception. However if you try to hold the shift key and then drag your selection, it is trying to ADD to your selection -- NOT the goal!
So what you do is begin to move your selection and THEN press and hold the shift key. This constrains the movement to 45 degree angles, making it much easier to find your exact placement! Alt-backspace to fill this with white.
|
 |
| Now we want another leaf there in the center, but not really a whole leaf. Drag-shift your selection down into place and have a look at this. |
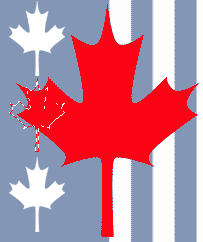 |
| If we were to fill the area of the selection now, we would have a white leaf which would cover part of the red leaf. Buzz.. not the goal!
So we want the selection we have... LESS the red part. So we'll SUBTRACT a selection of the red from the leaf selection we have.
Grab your magic wand and hold the alt key. See that little tiny minus sign there beside it? Ok now click the red part and watch your selection.
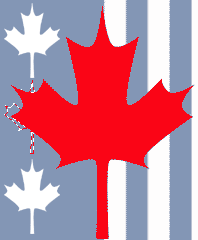
Alt-backspace to fill this in. All done! Now let's have a go at the Lasso!
|
|
|
|
|
II. Lasso.
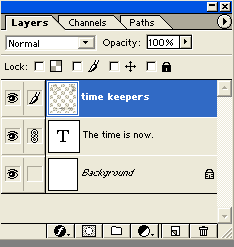
Let's look at another image, "The time is now." The timepieces are all on one layer, the text is on its own layer, and the background is separate. Suppose we have decided that we want to move the clock over a bit. It is in the "timekeepers" layer along with the hourglass and the wristwatch.
|

|
| Ok now let's select just the clock. With the "time keepers" layer selected in the layers palette, click-drag the lasso tool to grab just the clock. (What other tools might you use to grab the clock?) |
|
| Notice that, while you have the lasso tool chosen, if you try to move the clock, just the selection moves. .. Ah! you have to choose the MOVE tool! Type v to switch to it. |
|
Sometimes you may need to move a selection. If you want to make several shapes that are the same shape but different colours, for example, you can make the first one and select it, then move the selection and fill with the second colour, and so on.
To move a selection, put your cursor inside the selection whilst any selection tool is chosen. Your cursor will change into the little "move a selection" cursor. If you want to move the selection at 45-degree increments, hold shift after you begin moving.
|
|
|
|
Ok now let's assume that the image to the left (time.gif) has been flattened, but we need to take out the background, leaving it as you see to the left. How might we do this?
|
|
| Making a Selection from a Path.
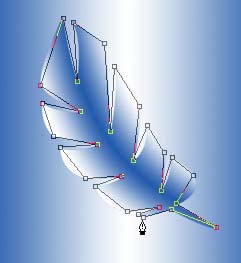
Ok.. so, as cool as the magic wand is, why can't we just always use it? Well, let's say that we want to remove the background from this feather image.
When the background has some colours that are close to your subject as is the case here, you might end up with some background chunks selected too. If this happens, you can lower the tolerance setting on your magic wand in the options bar.
With contiguous turned off on the options bar, when you click on a certain blue in the image, ALL the blue of that shade (within the tolerance you have set) will be selected. With contiguous checked, only the parts that are touching where you are will be selected. So, with the picture at the right, try using the magic wand with contiguous on or off? What happens?
Try adding to the selection. To add to a selection that you have active, hold the Shift key while you have your selection tool.
If you get too much selected, you can subtract from the selection by holding the alt (option) key and select the part you what to subtract from the selection.
You could go pretty crazy trying to do this selection with a magic wand. So you may have to use a different selection method altogether as I am about to show you....
|
To grab this file, opposite-click (right-click for most of you) and click Save As.. and put it somewhere where you can find it.
|
|
Touching with the magic wand.. holding shift to add subsequent touches to the selection....
|
You reach a place where the colour on the feather is too close to the colour of the background and .. yikes! The selection wanders off into the background! In part III, I'll show how I was able to select the feather.
|
III. Selecting from a Path.
As we saw above, using the magic wand when trying to select the feather, presented a problem. I ended up tackling this by creating a path and converting it to a selection. Can you think of another way? |
|
|
|
|
Here's how:
Touch the tip of the pen to each of the vertices, or turning points, of your figure. Zoom in as close as you need to go. (Hold the spacebar to turn your tool to the hand tool to move your image around if you need to.)
|
Then use the convert point tool to drag out the handles and form your Bezier curves.
I go more into how to make the curves in the heart tutorials and in the raindrop tutorial. (It does take a little practice to make the curves, but it sounds harder than it really is, once you just sit down and do it.)
|
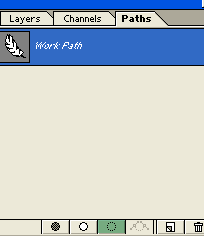
Once you have your path made, click on the paths palette. At the bottom of this palette is a button for convert path to selection. Your path has to be active for this to work. If it is not, use the white arrow (hold ctrl while you have the pen tool in use to switch to the white arrow) and click anywhere on the path.
Once your selection is made, then you can click Layer -> Add Layer Mask -> Reveal Selection; or you can fill the background on this layer as desired.
Note: If your image is on your Background layer, double-click this layer in your layers palette before you try to add your layer mask.
|
|
In this particular example, I found it good to add a layer mask because my original selection was not as precise as I might have hoped. Using the layer mask made it easier to edit my selection.
|
|
|
IV. Using a Quick Mask.
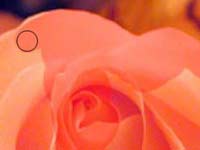
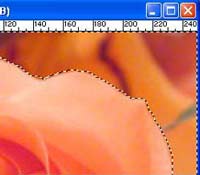
In selecting an object that is in many shades of colour from a background which is of similar sorts of shades, we could use one of several approaches. For this rose, I think that I would use a Quick Mask. A Quick Mask allows you to paint on your selection (or the masked area.. your choice). Then once you have your selection, you can delete it, recolour it, mask it, or whatever you need to do.
I am going to put a black background with green corners behind my rose, but I'll make the background later. First i'll make my rose selection.
Here's how to do this:
|
To use this image, first click on it (You have to be online), and then opposite click it, choose Save As.. and put the file where you can find it.
|
| First, double-click the layer in the layers palette so that it becomes a regular layer and not the background. Then choose File -> Save as, and rename your file and save it in psd format. It is always best to keep your original pristine and unmangled.
Then, to enter Quick Mask mode, first double-click your "Edit in Quick Mask mode" button (pictured in green in my screenshot to the right) to check your options. You want it to read "Color indicates Selected Areas."
You can even make the colour of your quick mask into the latest fashion colour, if you like. (Using a different colour can make it easier to see the mask. A time when you might wish to use a different colour mask would be.. this example, since the rose and the mask are pretty close in colour! I went ahead and used the 50% red, thought, the default.)
|
|
| Now that you are in quick Mask mode, you can use your painting tools (brush, airbrush, etc.) to paint what is called a "rubylith mask" onto your picture. You are not really painting on the picture, but you are creating a selection. If your rubylith should extend beyond a border, then you can erase it, too! Try this using a hard-edged brush and a soft brush to see the difference in your result.
|
|
| When you have your mask painted on as you want, you click on the "Exit Quick Mask" button on your toolbar (in red above). This makes the marching ants go around on the part of your image where you painted the rubylith.
(If you end up with the background selected, as i have here to the right, then do Select -> Inverse if you want to convert this to a layer mask as i did in the next step.)
|
|
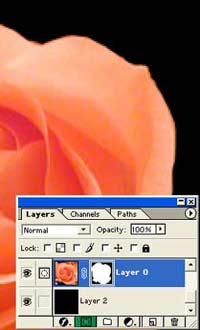
| Now that your selection is active, you can do whatever you want to the background. I want to convert this Quick Mask selection to a real layer mask. This way I can preserve the original background should I need to edit the selection later or do something different with the background.
To make your selection into a Layer Mask, with your selection active, click the Add Layer Mask button (here it is green). Et voilà! Masked!
Whatever you have in the layer below will show through. At this point, I clicked the new layer icon, chose black for my foreground colour and then clicked alt-backspace to fill that layer with black.
Should you see that your edge is a little rough or not accurate in some places, you can always edit your layer mask. Just click it in the layers palette, and choose either a white or black brush and edit your troubles away!
(For a more detailed treatment of layer masks, see my tutorial "Fading Images into One.")
|
|
| I touched a green airbrush to the corners of my black background to get this effect. |
|
|
|
|
V. Difficult Subjects.
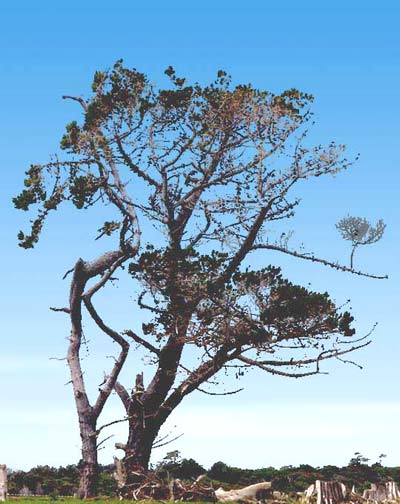
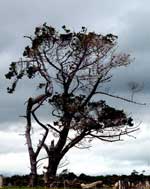
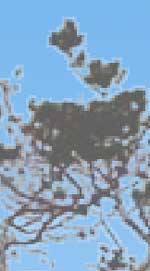
But what about that wispy-haired waif we want to take from a big-city background and place into the forest? Or what about this tree with this threatening sky to the right? Can we make this a pretty day? How can we select something complex like this tree with all that tiny detail?
In Photoshop, there are always at least three ways to do something.Since there is some pronounced contrast in this photo, one way to select the tree from the background is by using a threshold level adjustment.
Here's how I did it:
If your image is the background layer, double-click it in the layers palette to make it into a regular layer.
Then drag your image to the New Layer icon at the bottom of the layers palette to duplicate it. Click on the upper one of these, the new layer, in the layers palette to select it.
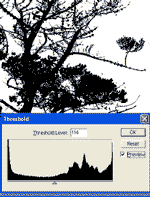
Image -> Adjust -> Threshold. Now right-click the layer in the layers palette and name it "Threshold."
When the dialog box comes up, move the slider left and right and watch your image. What you want is for your subject to be black and your background to be white. You will have to go back and forth to get just the right level of detail that you want. Click the Preview box off if you want to remind yourself where your image edges are. When the subject is black and the background is white, hit ok.
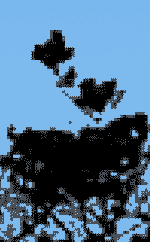
So now we have the relatively simple task of selecting just the black tree. Then we are going to use this selection as a pattern to cut the tree out of the original picture!
Choose your magic wand from the toolbox and make sure that contiguous is off. This will enable you to select all of the black pixels whether or not they are contiguous (touching each other). Then set your tolerance to a low number.
Now touch your magic wand to the tree (in the threshold layer.) This will select all the black pixels.
Now we will apply this selection to the duplicate original tree layer.
|
This photo was given to me for the use with this tutorial only. ©2001, Lynn Bishop of Canz Designs, New Zealand. You may use it for the purposes of this tutorial by clicking on the picture (to get the full-size version) and then right-click it. Click Save As.. and put the file where you can find it.
|
|
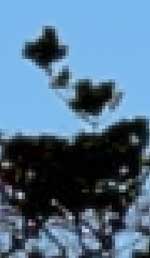
Your black tree is selected now. Click the eye off in the threshold layer. You should now see your original tree layer with the cloudy background. The original tree has the selection ants going around it.
Now click on the original layer in your layers palette. Click the Add Layer Mask icon at the bottom of the layers palette. Et voilà! Now what you did was you added a MASK to this layer. You did not delete the background. So if you wanted to, you could paint on the mask in either black or white to EDIT the part of the tree that is showing. This is the beauty of layer masks!
Now you can put in whatever background you want in the layer underneath the original one. I've made a white -> blue gradient sky layer.
|
|
|
Finally, because the tree was so dark in the original picture, the resulting cutout tree against a summer blue sky is too dark. We can fix that a bit with levels. Image -> Adjust -> Levels .. and then pull the light and medium sliders toward the left till you like your look.
|
|
|
Trouble-shooting.
|
There was a pretty hard edge around the perimeter of the tree when I did mine. This can lead to an overly crisp and fakey look. as in the shot to the right.
|
Softening this edge is one use for that layer mask. Click on the layer mask and then do Filter -> Blur -> Gaussian Blur and make it just one or 1.5 pixels. |
Here is something else that might occur. When you are placing something against a darker background than was there, you can get a whitish fringe around the subject. The same can happen with a dark fringe on a light background. So how do you fix this?
One way is to use Layer -> Matting -> Remove white matte (or remove black matte).
|
 |
 |
 |
|
|
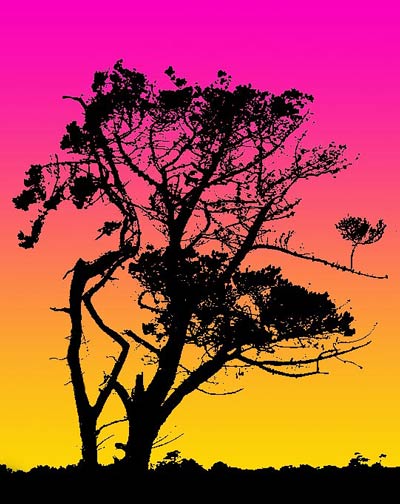
Here is another way to use that black silhouette tree that we got from doing the threshold adjustment.
|
|
|
I show just ONE way to do this tree selection. Some people have told me that they know a better/faster/more elegant way to select this tree than the one I suggest here.
How many ways can you think of to do this? Tell me your favorite way and if it is different from the ones here, I'll post it at the bottom of this tutorial!
|
I hope you have had fun with the activities in this tutorial and that you picked up some tidbits along the way!
Always me,

|
|
More ways to select this tree:
In your example of the tree, I prefer a slightly different approach. You can use the fact that the sky only contains blue and white, usually. The blue channel is therefore 50% of the way towards being the required silhouette, because the sky area is probably a fairly uniform light gray. All you need do is make an alpha channel from the blue channel, roughly lasso the major part of the non-sky region and fill with black. Then touch up and enhance the image, finally using threshold with a hint of blurring to give a true b&w silhouette. Create a selection from the alpha channel and then add layer mask, revealing or hiding the selection as before. I understand that your tutorials are designed to demonstrate the use of tools like magic wand along the way, but I do think this way is better in practice. (I expect there are at least four more ways of doing this!).
John Houghton
|
Some Advanced Selection Tips
1- In prepress clean jobs, always use PEN tool.
2- In case of hairy subjects, use PEN also if you have a magazine cover person. This sounds crazy, but they pay well. If the job is not well-paid, use Janee's procedure.. It is good, but do not forget to make a backup layer... Do not tell me I have history palette, because you'll need to purge history from time to time to free up some scratch space needed in processing layers. In addition to the procedure you may consider the following tricks:
a- In addition to threshold, you may use adjustment layers such as Hue/Saturation to increase saturation, simple brightness and contrast, to emphasize external edges, then turn on (Use All Layers) option before you use magic wand.
b- Instead of cutting sharp edges, sometimes it is more practical to stroke edges, after adding new layer above, with a layer option of Normal, and suitable transparency. Stroking edges (center option), for high resolution picture, with a hair of one pixel will add to the details rather than erasing them. If you are satisfied with the stroke, just merge down. For this step to succeed, you need high resolution for enough pixels. If your image is low-res, you may resample it to 400 percent, then after stroking, resample again to 25 per cent. Those two resampling steps will even add anti-aliasing to the edges.
c- You may actively enlarge selection made by the Magic Wand, using Select>Grow.. Grow tool's threshold is adjusted everytime using the Magic Wand palette's threshold. Thus, the sky in your tutorial may be first selected with Magic Wand, then Grow after you oversaturate by using Hue/Saturation adjustment layer.
d- Another important selection tool is the Similar tool. I talked about that tool before in your Line Art Tutorial.
e- Sometimes it is helpful, after putting a saturation layer to work with your selection tools directly from channels palette. If you are in RGB mode, you may activate those channels one by one... you may notice important similar terrains, that you may select one by one, then you turn RGB combination on.
f- Sometimes converting a COPY of the image to CMYK space may help in finding more similar terrains in four channels rather than 3, then you make a layer mask, and convey it back to original image.
g- In case that you have gradient background with various colours, do the following: Put new layer... Make a gradient similar to the gradient beneath to the best quality of resemblance you could and same orientation... Turn on Difference Mode of the layer... Surprise... your background is all black. And you can sometimes select it using single try of Magic Wand, if you mastered the gradient well! Original trick.. isn't it?
h- It is sometimes helpful to use selection free transform.
Mohamed Al-Dabbagh
Senior Graphic Designer
|