 Flowers along a Path Flowers along a Path |
jjj |
This only SOUNDS like a tutorial in gardening! Actually, the flowers you plant in this tutorial will be along a path in Photoshop! As you work through this tutorial, you will learn and practice some useful skills. Among them are these:
- Making a path.
- Adjusting the spacing for a brush.
- Adjusting Color Dynamics for a brush.
- Stroking a path.
- Making a "Utility Brush" and storing it right at your fingertips.
For more on using the painting tools in Photoshop 7, see
 PS Painting 1, Brushes in PS 7 PS Painting 1, Brushes in PS 7
 A Red Rubber Ball A Red Rubber Ball
 Impressionist Heart Impressionist Heart
 Flowers Along a Path Flowers Along a Path
|
If you have not yet made a path using the pentools, please go through one of my other path-making tutorials first. I suggest one of these:
 Heart 1 Heart 1
 Rain Rain
 Impressionist Heart Impressionist Heart
|
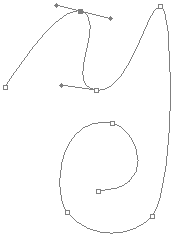
| Begin by making your path. For this example I used two paths.
a. Using your pen tool, with the PATHS button selected in the options bar, tap where you want to have anchor points. Remember that the fewer anchor points you use, the smoother your curve will be.
b. Using the Convert Point tool (under the pentool) click on the points where you want to have curves and drag out your bezier handles. It takes a bit of practice to get good with paths and the pentool. If you want screenshots of dragging out these handles, you may want to check out my first Heart tutorial.
|
 |
2. Once you have your path, you will stroke it, first with the solid background color for your letter, then with your flower brush. In order to stroke the path, you have to be really clear with PS. You have to tell it the bru-co-pa-la, or, in other words
- what brush you want to use
- what color/s you want to use
- what path you want stroked
- on what layer you want this stroke to go
Ok, so i have odd ways of remembering things. <g>
First we will stroke with the solid background brush and then we'll do the fleurs. So let's set up the brucolapa:
a. Type b to bring up your PaintBrush Tool. Click the tab (or button) for your Brushes Palette. This is over to the right side of the options bar.
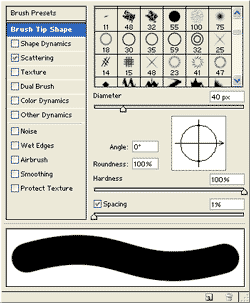
Click on Brush Tip Shape and choose one of the hard round brushes. Use the [ and ] on your keyboard to increase or decrease the size till it is as you want it. Move its spacing slider over to 1%. Ascertain that your flow and opacity are 100%.
b. Choose the color for your solid background of your letter in the color picker.
c. Click the New Layer icon at the bottom of the Layers Palette to make yourself a new layer on which your stroke will go.
d. Now you just have to tell it what path. Click the Paths tab and, in the list there, click the path you are wanting to stroke. At this point, you just have one path and it will show up as a thin black line on your canvas. Now click on that thin black line. The Anchor Points will show up on the path when it is ready to be stroked.
|
|
Digression: Making a Utility Brush ...
and storing it in a handy place.
This brush for which you just made these adjustments is a brush that you will likely use often.
Here's a tip: Once you get this brush as you want it, in a width that you use often, make it a Preset!
|
|
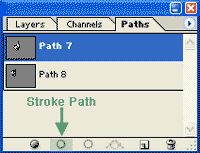
| d. Click the Stroke Path button at the bottom of the Paths palette. This will stroke your path with the brush settings you have. It will also use either the foreground color, foreground-background, or other colors, depending upon how you have set your color dynamics. And it will put this stroke onto the layer you have chosen for it. |
|
| e. Now to plant the fleurs! Make a new layer above your solid line you just made.
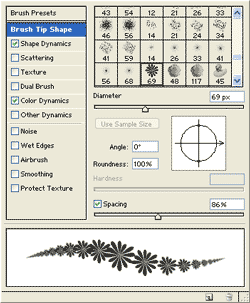
f. Choose the flower brush under Brush Tip Shape in the Brushes palette. While you are in that screen, change the spacing to about 100%, or less if you want the fleurs to overlap, more if you want space in between.
|
|
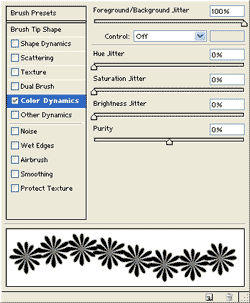
| g. For this effect, turn off all the dynamics, except color dynamics, by clicking any checked boxes.
h. The only dynamics i used for my fleurs is Color Dynamics. To set that, click on the WORDS Color Dynamics, to bring up the options. Then set the Foreground to Background Color Jitter to 100% and everything else to 0 (for my effect).
Set the Opacity and Flow to 100%.
|
 |
|
i. I encourage you to experiment with all the sliders to see what they do to your brush and your stroke.
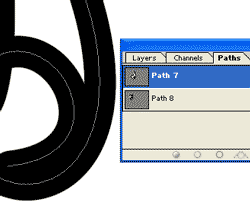
j. When your brush is as you like it, bring up your Paths palette again, by clicking its tab, and then click the path in the palette to make it active.
k. Click the Stroke Path button at the bottom of the palette. This should "plant your flowers!
|
 |
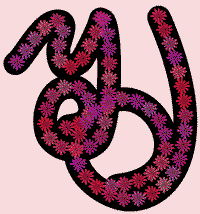
And here is our finished result! I hope you have enjoyed this tutorial on painting along a path with a special brush in Photoshop!
For more on using the painting tools in Photoshop 7, see
 PS Painting 1, PS 7 Brushes PS Painting 1, PS 7 Brushes
 A Red Rubber Ball A Red Rubber Ball
 Impressionist Heart Impressionist Heart
|
 |
|
|
RETURN to Janee's Archive Tutorial Index
Ask tutorial questions in the Message Board or email me!

|
|
|
| All material in this site is ©2001 - 2003 by myJanee.com Graphic Creations. No part of it may be used without my written permission. If you have questions or comments about this site or its construction, contact Janee at myJanee.com Graphic Creations by email. |
|
|
|