|
|
| Ok, you have been making brushes for all your Photoshop tasks and now you have a zillion of them. How do you arrange them so you can easily find them?
This tutorial will lead you toward organizing your brushes. You'll learn the following:
- How to load a new brush collection to Photoshop
- What is a Brush Library?
- How to add a brush to a specific Library
- How to move a brush from one Library to another
- How to take brushes out of a Library
- How to rearrange your brushes within a Library
- Saving a brush Library
- Making a Brush Tool Preset
This tutorial will make more sense to you if you have worked with Brushes a bit, but it would be good for you if you're new to this, too. I've written this tutorial with PS CS, but it will work with version 7 and later versions, too.
Users of PS Elements 2 can use all of this except the part about Tool Presets at the end. Your screenshots will look a bit different, but the rest works the same for you! |
| What is a Brush Library?
People often ask me how to add a brush to a folder, or how to move a brush from one folder to another. The fact is that they are not exactly in folders, as we have come to think of them.
Instead, Adobe uses what they term "Libraries" to house brushes (and shapes and patterns, as well). Each Library will hold not one brush, but a collection of them. So you really can't just drag a brush here or there within Windows Explorer, as you could with a file. You have to work within PS, in the Preset Picker or Preset Manager environments. That's what we're talking about in this tutorial! |
|
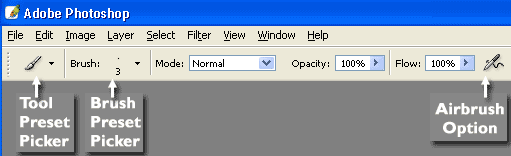
After you choose your Brush tool  in the Toolbox, you'll see this Options Bar at the top of your window: |
A. Adding a new Brush Collection to Photoshop
There are two ways to add brushes to your system: make them or get them elsewhere.
Suppose you have downloaded a brush collection and want to use it. Here's how to install this:
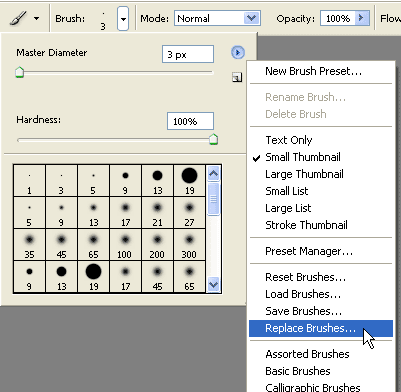
- First choose your Brush tool. Then click the drop-down arrow for the Brush Preset Picker. That’s the second label above, where you see the current brush sample.
- Click the flyout arrow in the circle at the top right on this box. One of the choices is Replace Brushes. Choose that and find your new brush collection on your hard drive. Click the Load button.
| TIP: If you choose Load Brushes from that flyout menu, Photoshop will add the new brushes to the current library. |
- And there they'll be! If you want to save these to your PS Brush Library folder, click that arrow again and choose Save Brushes. Surf to your Brushes folder in Presets (Programs > Adobe > Photoshop > Presets > Brushes). Name your file.
You'll have to close PS and reopen to see your new Brush Library in the dropdown list.
|
 |
|
B. Adding a new brush to a Brush Library
You've just made a new brush! YAY! But then you realize that it's in that generic Assorted Brushes Library along with all the others that you've made. How do you put it where you want it? The easiest way is to put it where you want it to begin with -- that is, when you're making the brush.
Here's a habit which will help you on your way to an efficient Photoshop workflow: When you make a new brush, before you hit that Edit > Define Brush Preset, first replace the current brush Library with the one where you want this new brush to reside. (Do this just as you did in part A above. Click that dropdown and then the flyout and choose Replace Brushes.)
Then make your selection, turn off your background visibility, and use Edit > Define Brush Preset to create your new brush. |
|
C. Moving a Brush from one Library to another
I said in the lavender box at the top of this page that we can't do this. Well, we can't in a technical sense, but we can in a practical sense. Here we go.
Suppose you have an Assorted Brushes Library crammed full of all kinds of brushes -- ones that came with PS, ones you made whilst you were painting a nature scene, a text brush you want to have around to reuse, your copyright brush, and some brushes you have made for photo-retouching.
And suppose you have other Libraries which are in similar shape? Is it possible to consolidate all the text brushes into one Library, all the natural textures into another, and all your retouching brushes into a third? Yes!
You will do this by making one huge Library consisting of each smaller Library containing brushes you want in your new collection.
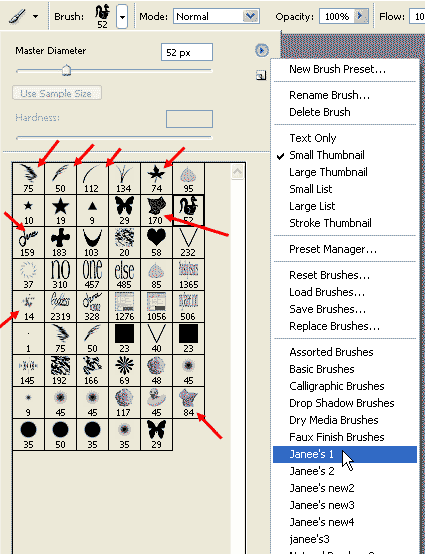
1. Click the Brush Preset Picker dropdown. Then click its flyout.
2. From the listing there (see at right), choose a Library that has brushes you want to have (or choose Load Brushes).
3. For each Library choice, click Append in the dialog box.
This combines all the brushes into your Brush Preset Picker.
At the right, I've appended three different Libraries, each of which has something I want in my new collection.
Now Alt-click any brushes you do not want in this new Library. You'll see little scissors, telling you that the brush is about to be cut.
|
 |
|
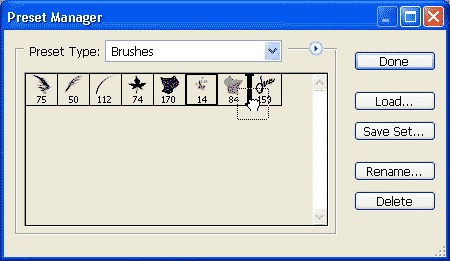
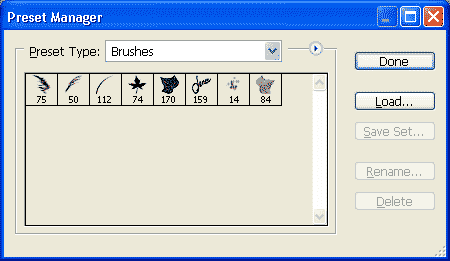
D. Rearranging Brushes within a Library
So now you have your brushes in the same Library. How do you arrange them as you want them? Use the Preset Manager for this. It looks startlingly similar to the Brush Preset Picker, where we have been working. But you can do some more things in this environment -- like rearranging brushes!
To get to the Preset Manager, use the same flyout on the Brush Preset Picker, or you can use the dropdown for the Tool Preset Picker. Choose Preset Manager... from that list.
Now you can drag your brushes around to whatever positions suit you. |
 |
|
|
|
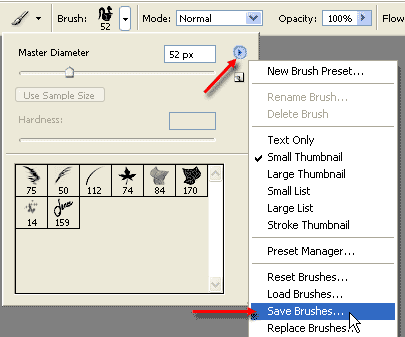
E. Saving a Brush Library
You've made your Library and rearranged it just as you want it. Now SAVE it!
For some reason unknown to me, there is no Save Brushes option in the Preset Manager, so you have to go to the Brush Preset Picker again. Click that flyout arrow at the top. Choose Save Brushes. Surf to your Brushes folder in Presets (Programs > Adobe > Photoshop > Presets > Brushes). Name your file! |
 |
|
F. Making a Brush Tool Preset
You're working on a painting and have your paintbrush just as you want it. But you want to "grab" a different brush for another part of the project. How can you save the first brush, so that it will be available again?
In Photoshop (not in Elements 2) you have Tool Presets! You're going to love this.
1. First, get your brush just as you want it -- Brush Tip Shape, Spacing, Tip Size, Scatter, Shape Dynamics... whatever. You set these in the Brushes palette. (If you don't see this, use View > Brushes.)
If it's a brush that you will often use the same colors, go on and set your colors as you need them, along with the Color Dynamics.
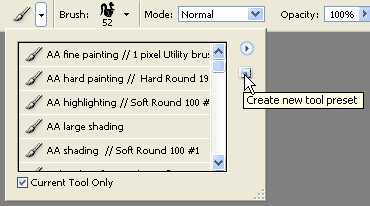
2. Now click the dropdown for the Tool Preset Picker, the choice on the far left of your Options Bar.
3. Click the New Preset icon. If you want this Preset to remember your colors, click the box for Include Color.
4. Give your new Preset a descriptive name.
You can keep collections of Presets for various tasks, too. Use the flyout arrow on the Tool Presets window and choose Save Presets.
Now you can name this collection so that you can find it when you want to do this sort of work again!
You can delete individual Presets from a collection, if you want, as well.
So there you are! A great way to keep your brushes and tool presets organized! |
| Tip: If you want to keep your new Preset right at your fingertips, you'll want it to be near the top of your listing. I keep my more frequently-used brushes near the top by putting AA at the front of their names. |
|
|
| |
|
I hope you enjoyed this tutorial!

|
|
|
RETURN to Janee's Archive Tutorial Index
|
|
|
| All material in this site is ©2001-2005 by myJanee.com Graphic Creations. No part of it may be used without my written permission. If you have questions or comments about this site or its construction, contact Janee at myJanee.com Graphic Creations by email. |
|
|
|
|