|
Building a Bulletin Board in Photoshop
Part 3: Making a Glass-headed pin
|
 |
|
|
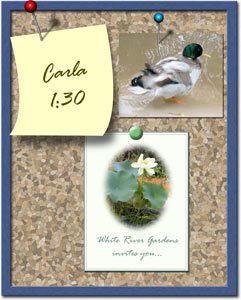
Now that we have made a bulletin board in Part 1, and framed it in Part 2, let's post some bills. But first we need to have something to post one with!
In my interface at the top of this page, I've used several means for which to post my bills. One of them is the ball-headed pin. Let's make one of them next.
| This tutorial will work just fine with either Photoshop or Elements. I wrote it using PS CS, so the screenshots are from that program. If you're using another version, or Elements, your screen will look a bit different from mine, but you'll get the same results. |
|
|
|
Keep in mind as you do this, that the devil – and the reality! – lies in the details!
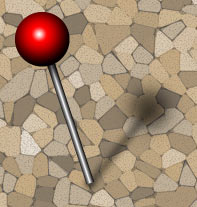
Let’s make a pin with a spherical top. We’ll begin by making a custom gradient which will give us a nice, shiny, glassy ball. Then we’ll use another gradient to make the “business end” of the pin, and finish the effect with some shadows. Let's go!
a. Make a new layer and label it “Pin Top.” Type DX to make your colors white on black.
| TIP: Keyboard Shortcut
To make your colors white on black, type D X.
D makes the Default black on white, and X reverses them!
|
|
As you work through this tutorial, you'll learn or practice the following:
- Making a Custom Gradient
- Setting Gradient Options
- Using selections
- Making and using a Shading Brush
- Making a Brush Preset
|
|
|
Choose the Elliptical Marquee tool. Hold Shift to constrain your elllipse to a circle and drag out a selection for the top of the pin.
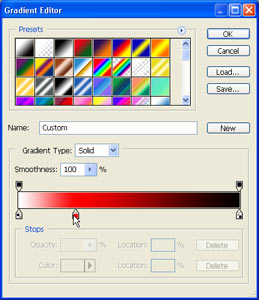
b. Now we’ll set up the Gradient Options.
|
 |
|
|
- Choose the Radial Gradient option.
|
|
|
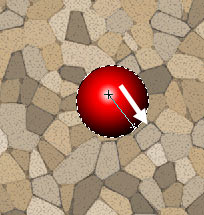
c. Now that the options are set, let's make the gradient! Drag your gradient from a spot just up and left of center, to the lower right corner, or a little beyond. (This is for a light source above and left of your pin.) This may take a few tries to get it just as you want it. Ctrl-Z is your friend here.
Ctrl-D to deselect. |
|
|
d. Next, we’ll make the “business end” of the pin.
- Create a new layer beneath the Pin Top layer and label it “Pin.”
- Make a rectangular selection with the Rectangular Marquee.
- Choose the Gradient tool and click the gradient to bring up the Gradient Editor. Choose the foreground to background gradient and hit OK.
|
| TIP: A handy shortcut!
You can create a new layer beneath the currently active layer with just one step! Hold Ctrl as you click the Create a New Layer icon.
|
|
- Choose the Reflected Gradient option.
|
 |
- Make your colors white on black.
- Make a thin rectangular selection for the pin.
- Zoom in closely enough that the pin selection looks large.
- Hold Shift and drag horizontally from the center of the selection toward the right. Ctrl-D to deselect.
|
|
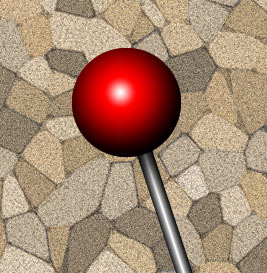
| Rotate the pin into position by using Ctrl-T. |
|
|
Looks pretty good, eh? Now let’s add some shadows:
e. First, let’s make the shadow ON the pin. This is the slight shadow cast by the head of the pin onto its shaft.
- Make a new layer beneath the Pin Top Base layer and above the Pin layer. Name it “Shadow on Pin.”
- Ctrl-click the Pin layer in the Layers palette to load it as a selection. This will keep you from painting anywhere but on the pin.
- Choose a shading brush. (My favorite brush for shading is detailed just below.)
- Paint just a bit of shadow onto the pin’s shaft. This is the shadow which would be cast by the pin’s head.
|
|
Shading Brush
For shading, I like a large, soft brush, with opacity set to 100% and flow set to about 30%. Spacing (in the Brush Options tab, click Brush Tip Shape) should be about 30%.
These settings will give you a nice shading brush, for easy-to-control, soft and gradual transitions. If you find that you like this brush, make a Shading Brush preset:
- Set up your brush, just as you like it.
- In the Tool Preset dropdown, press the New Preset button.
- Check Include Color if you want your shading brush to be black by default.
- Name the brush AA Shading. The AA will keep your frequently-used brush presets at the top of the stack!
|
|
|
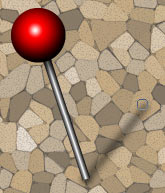
f. Painting the pin’s shadow freehand is the best way to proceed here, but don’t let that daunt you. Here’s the step-by-step:
Make a new layer beneath the pin layers. Label it Pin’s Shadow.
Choose your Brush tool. You have your “Shading Brush” chosen from the shadow work you just did. We’ll use this same brush, with a smaller tip. Use the [ key to reduce the diameter of your brush, till it is the width of the pin’s shaft.
Click the brush at the base of your pin, and release the mouse. Hold Shift and click again at the end of where you want the pin’s shadow.
|
 |
|
Use the ] key to enlarge your brush tip to just a bit smaller than the pin’s top. Click the brush at the top of the pin’s shadow to make this part of the shadow.
If necessary, you can reduce the opacity of this shadow layer a bit.
|
 |
Taking it further
Now you can post all kinds of bills!
Take care with the shadows for anything that you post. Usually a Drop Shadow Layer Style is fine for flat notes, but you will want to do a special shadow for a note like my “Carla 1:30” or for any overlapping notes. The shadow for Carla was hand-drawn, using my shading brush, on a layer beneath the note.
Items you post on your bulletin board are limited only by your imagination! You can use your bulletin board to tell a story or simply as an expression of your art.
Use a bulletin board for a cool backdrop for a scrapbook page, containing memorabilia of a special person, day, or obsession. This would also be a clever way to announce an upcoming event!
I have tutorials posted for several types of paper you may want to post on your bulletin board:
 Torn Paper Torn Paper
 Burned Paper Burned Paper
 Folded Paper Folded Paper
 Curled Paper Curled Paper
 Post-It Note Post-It Note
|
 |
|
|
|
|