|
Folded Paper
|
This effect is one I've been asked about often. What you are creating is the illusion of folded paper. You do this by reshaping the paper and by applying appropriate shading. I've tried several other, sexier, newer ways to do this effect, but this works best and the most easily, so here you are.
In this tutorial, you will work with several of Photoshop's tools and techniques including these:
- Selections
- Layers
- Transformations using distortions
- Gradient tool
- Paintbrush
- Keyboard shortcuts
|
This tutorial is written for beginners with PS, but I think that more experienced users might learn a trick or two, as well.
The tutorial will work equally well with any version of Photoshop or Elements. The screenshots for this tutorial were done with PS 7, so if your version is different, your screenshots may vary.
|
|
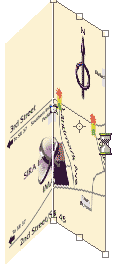
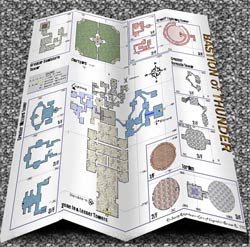
I will start by using a map I made. You can use any image file, including just a plain colored rectangle.
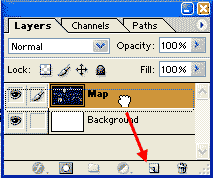
1. Drag your image to the Create a New Layer icon to duplicate it. This is just insurance. If you should screw up the next parts, this will give you a handy backup.
If you don't want to duplicate the image layer, you have to be sure that you are working with an image that is NOT the background. Double-click it in the Layers palette to make it a regular layer.
After you have made the duplicate copy, turn off the visibility eye for your original image.
While we are insuring ourselves against loss, go on and save this file. File > Save as... Keep it in PSD format and give it a name and location that make sense to you.
Next, enlarge your canvas. This is actually optional. I didn't do this in my map folding exercise, but if you want your image to be close to the same size that it is now, you will need more canvas. Image > Canvas Size.... Click Relative and give yourself some extra pixels.
|
|
|
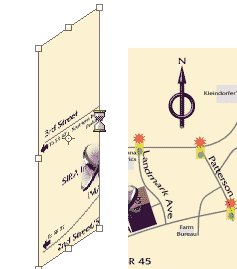
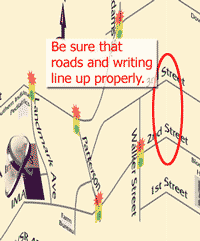
2. Now we will cut the map apart, beginning with the leftmost section:
- Drag guidelines out from the left ruler to divide your paper as you want it to be folded.
|
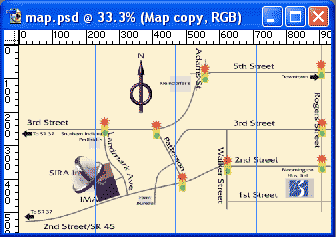 |
- Choose the Rectangular Marquee tool and drag a rectangular selection in the first segment as I've done to the right.
- In PS (not Elements), Ctrl-Shift-J will cut this piece out of the current layer and put it onto its own layer. (Alternatively, you can do Layer > New > Layer via Cut.)
- Repeat this same procedure for the other sections of the map. (Select, Ctrl-Shift-J) When you have just one section left in the map, you can quit. Each section should be on its own layer.
NOTE: You have to click the image layer for each slice, or PS will try to cut it from the cutting you just made, and that won't work.
|
 |
Tip: Remembering keyboard shortcuts.
How you remember these is up to you, and everyone learns differently. I like to learn these just one at a time, and, after a few years of using Photoshop, I am still learning them.
Don't even TRY to learn all the shortcuts, and especially shortcuts for operations that you don't use much. But if you find yourself going to the same menu items a lot, you will probably save a good amount of time by learning the shortcut.
The shortcuts for the processes are beside the menu items. The tool shortcuts are pretty straightforward. Hovering over any tool will give you the keyboard equivalent, so this can help you to learn these.Typing G brings up the Gradient tool. C, the Crop tool, V the moVe tool, B the Brush, and so on.
I will help you out with keyboard shortcuts, by using them in my tutorials. It is a good practice to get used to using the common keyboard shortcuts, as these will save you lots of time and fishing around for menu items. I won't give you shortcuts that I don't consider "common."
|
 |
|
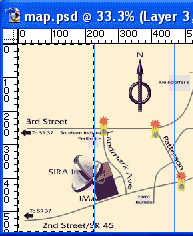
4. Choose the leftmost of these pieces in the Layers palette. We'll do the distortion on it first:
- Ctrl-T (or Edit > Free Transform) to bring up the Transformation bounding box.
- Now hold Ctrl so that you can move your handles to distort the shape.
- Grab that middle handle on the side, and pull this side over and up, forming a parallelogram. (See below.)
- Hit Enter to complete the transformation.
|
 |
|
|
 |
|
5. Continue in this way, choosing each of the cut layers, transforming it, and then, use the moVe tool to move it next to the others. If it is close, and you need to nudge it just a little bit, you can do this with the arrow keys, once you have selected the moVe tool.
|
 |
| 6. It's time for the shading. We will use a couple of different coloring tools here, using a new layer on which to put the shading. You will see why in a minute.
In order to keep the shading within the pieces, do it within a selection. By selecting one piece at a time, you will get the most natural result. Here's how:
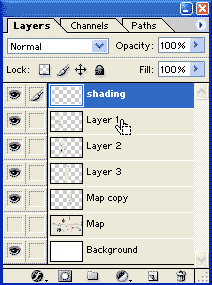
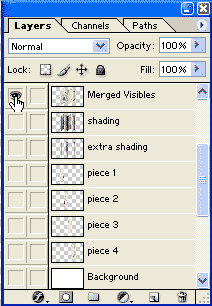
- Click the Create a New Layer icon and name your new layer "Shading."
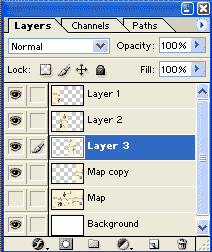
- Ctrl-click the thumbnail for first of your section layers, for the layer I'm indicating to the right. This loads the first piece as a selection. Be sure, though, that your shading layer is the chosen (highlighted) one in the Layers palette.
- Type D for your Default colors, black on white.
|
In this picture, the layers which are my cut pieces of the map are Layer 1, 2, 3, and "Map copy." Later on, I rename these.
To rename a layer, double-click its name in the Layers palette and type in the new name.
|
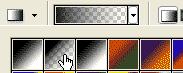
- Type G to choose the Gradient tool. In the Options bar, choose the Foreground to Transparent Gradient and the Linear Gradient option.
|
 |
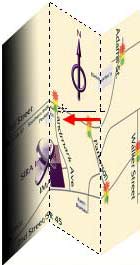
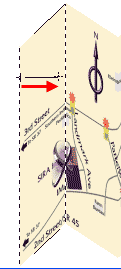
- Drag the gradient from the edge inward, as I am doing here. Holding the Shift key keeps the angle constrained to 45° increments, making it easier to keep it straight.
- Do the same with the next panel. The gradient itself is going onto the shading layer, still.
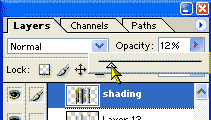
- Once you have all of these gradients done, in the Layers palette, reduce the opacity for this shading layer, as shown below, right.
Note: This ability to reduce the opacity of the shading is something that we can do ONLY because we did this shading on a separate layer. Having a separate layer for the shading enables us to not only change opacity, but we could also erase parts of the shading, apply a different blending mode to that layer, or even throw away the layer and start over!
|
 |
|
|
 |
| On another shading layer, you can add more "accent" shading, if you need more definition. Again, reduce the opacity for this layer, so that it is just a shadow.
At the right, I've selected the 2nd panel and, with a wide soft brush, and black, I'm adding some definition to the crease. I then decreased the opacity on this layer, and also further decreased the opacity on the other shading layer.
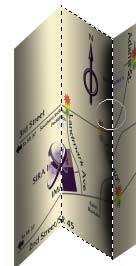
The result of this opacity decrease is the paper just below.
|
 |
| Here, I've set my paper onto a piece of oak which I made with this oak tutorial.
If you want to have the paper sitting on a surface, you may want to add some perspective to it. This is the same sort of transformation that you did to make the folded segments of the paper.
In transforming this, it would be cumbersome and goofy to try to manipulate each piece and the shadow layers individually. Instead, you want to manipulate them all as one unit.
Photoshop gives us several options for doing this. (You just have to do one.):
- Merge the layers for the pieces and the shadow layers.
- Link the layers.
- Make a Merged Visibles layer.
I like the last choice here, because it preserves your separate layers, yet gives you a single unit with which to work.
|
|
|
Tip: Making a Merged Visibles Layer
You will see this idea in various "tips" books, but in all but mine, you will see complex ways of doing this which involve holding keys whilst clicking something on a menu -- a difficult proposition for even the most nimble-fingered of us!
My method is a 4-key thing, but once you have done it a couple of times, it isn't hard to do at all. Here's what you do:
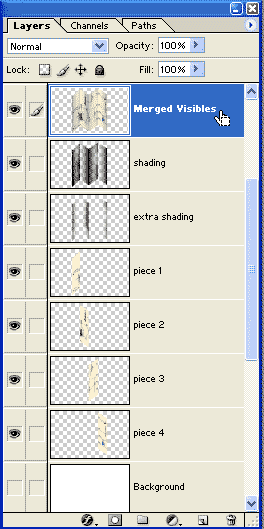
- Turn off the visibility eye for any layers you do not want included in the merged visibles layer. (In the case of this folded paper, i want to transform JUST the map and its shading. I do not want the white background involved, so i turn off its visibility eye.)
- Make a new layer above all the other layers.
- With the new layer selected, Ctrl-Alt-Shift-E. This pastes a snapshot of all that is showing on your canvas into the new layer.
Now this layer can be manipulated however you wish, but you still have your layers intact, in the layers below, should you wish to go back and change something.
Note: You can do the whole thing, including making the new layer with a 2-part shortcut: Ctrl-Alt-Shift-N (makes the new layer). Then, keep the modifier keys held down as you do Ctrl-Alt-Shift-E, to stamp the visible layers onto this new layer.
|
 |
|
For this next step, we want to see ONLY the Merged Visibles layer. To make ONLY it visible, Alt-click its visibility eye.
|
 |
|
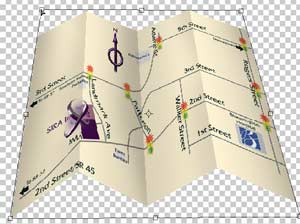
Ctrl-T to bring up Free Transform.
Hold Ctrl and drag in the top two corners. Bring the top edge down, till your perspective is correct.
|
 |
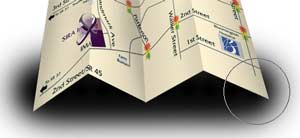
| For the shadow under the paper, you can use a large soft brush with black, on a separate layer, this time beneath the map layers.
Keep in mind your light source. If the light is from straight above, the shadow will look like mine. Otherwise, it will be different. If you are in doubt about the way it should look, fold some paper and look at it in various lighting.
|
 |
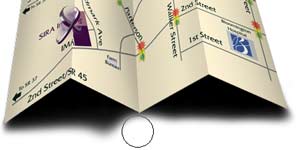
| Judicious use of a soft eraser at the edges and under the fold, as shown, will complete the shadow.
Be careful to NOT erase into the shadow at the ends under the paper. If you erase the shadow at the ends, it will look like the paper is "floating." If you want to depict the paper in softer light, you can decrease the opacity of the shadow layer.
In case you have not figured it out by now, the shadow and shading are the key to the realism here!
|
 |
|
I hope you enjoyed this tutorial!

For more on photorealistic effects, I hope you'll have a look at my Photorealistic Painting class!
|
 |
|
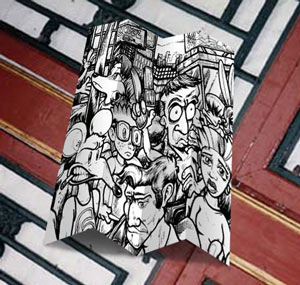
Student Work:
|
|
|
RETURN to Janee's Archive Tutorial Index
email me!
Ask tutorial questions in the myJanee.community:

|
|
|
| All material in this site is ©2001-2006 by myJanee.com Graphic Creations. No part of it may be used without my written permission. If you have questions or comments about this site or its construction, contact Janee at myJanee.com Graphic Creationsby email. |
|
|
|
|