|
Website Interface with Rollovers
Part 1: Creating the Interface Shape
|
 |
|
|
|
In this tutorial, we'll make a sixties-style space age website interface which uses rollovers (as if there were such a thing as websites in the '60's!). For the sake of your sanity, I'll be dividing this tutorial into 6 parts:
- Create the overall shape and texture for the interface.
- Make the buttons.
- Make the rollover states.
- Slice the image.
- Set up the rollovers in ImageReady.
- Optimize and save this in ImageReady, test it, and watch, as we hope it come to life!
|
Although this tutorial is written with beginners in mind, it could probably be considered an intermediate tutorial, because of the wide variety of skills employed. If you are a beginner with Photoshop/ImageReady, I hope that you will take your time with this tutorial and be patient with yourself.
I have written this with Photoshop CS (8), but everything is identical for version 7, and likely will work for earlier versions, too. Many of the tools are not available in PS Elements, so if you're using Elements this tutorial won't be of much use to you, except in getting ideas!
|
Creating the Interface Shape
ANY shape can be used for a website interface. This interface I'm demonstrating here should serve as just a jumping-off place for your own creativity! If you already have a design for an interface, but just want to know how to make the rollovers, you can head over to Part 3. You may want to look over Parts 1 and 2, though, on the way, just to see what this tutorial covers.
Much of designing in Photoshop involves problem-solving. You see something and you have to imagine how it would be made. Then you try it and either have joy, or not. As we work through the creation of this shape, I'll be showing how this process works for me.
For creating the overall interface shape, I will show how to use the following tools and techniques:
- Shape tool
- Guidelines
- Selections
- Gradient Tool
|
1. Set up.
File > New. Make your file RGB, 1200 pixels wide and 500 pixels high. These sizes are not critical. I'll never know if you use other sizes. If this is for web use, 72 ppi is fine.
File > Save as... PSD format, put it in a sensible place, and give it a memorable name.
|
| Tip: Save your work!
Once you have saved as a PSD, everytime you add a layer or put something on a layer, everytime you say to yourself, "Hey, that worked," do a Ctrl-S to save. This will preserve your layers and preserve your sanity, should you have a power blip.
DON'T wait till that power blip to wonder, "Gee, I wonder when my last save was?" If you have to wonder, then it's been too long.
|
|
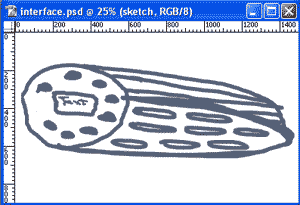
2. Make a rough sketch of what you want.
Use a paintbrush and paint on a new layer something like what you are planning to make.
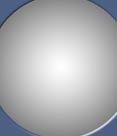
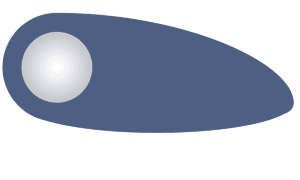
I'm making this silver-blue lozenge-shaped interface with a circle at one end and silvered lines on the upper right. The circle will contain buttons that are of different colors and a panel which will I could make to show different text depending upon which of the various buttons are rolled-over.
|
 |
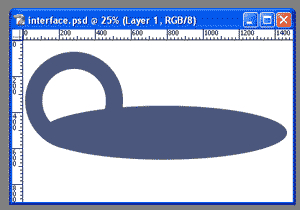
3. Figure out how to compose your shape.
As you did your sketch, you were, I hope, thinking about how your shape is going to be put together. With mine, I see that the bottom part where the buttons are to the right is essentially an ellipse. The round area where the buttons are to be is a circle. The part with the silver lines is ... kind of a fill-in shape.
Before you start on these shapes, turn off the visibility eye for the sketch. You can always flip it back on, as you need it.
To do my initial ellipse, I choose a color and then the shape tool's ellipse from the toolbar. Be sure that Fill Pixels is chosen in the Options bar, as shown below. The Fill Pixels option is the third little button in that first set.
|
| Tip: When you are doing a project like this, always put everything on a separate layer. That way, you can move component parts around easily, if you need to! |
|
|
|
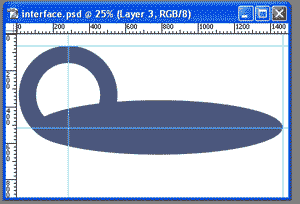
4. Do the Bezel.
On a separate layer, I dragged out the open circle shape to form the Bezel. This is a custom shape in the All Shapes library. Holding Shift keeps it a perfect circle. What's another way to do this open circle shape? (Hover over the image to the right for one answer.)
Label this layer "Bezel." (Note: In some of these Layers palette shots, I have mine named "circle.")
|
 |
5. Add some Guidelines.
Next, we're going to use the pen tool to fill in that shape where we are going to have the silver lines. Before we do this, let's mark the top of the bezel and the right point of the ellipse.
With the circle layer chosen in the Layers palette, drag guidelines from the rulers to the midway point on the circle and then to its top. Next, choose the ellipse layer and drag guides to its center and right side. When that layer is chosen, it is easy to get the guides to "Snap to" where you want them.
(Note: If your guides don't "Snap to," go to View > Snap To... and be sure that Guides is chosen.)
|
 |
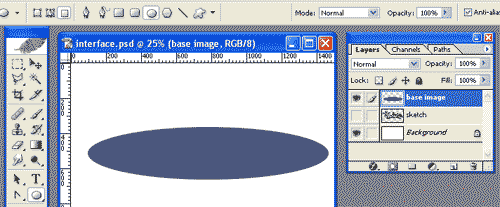
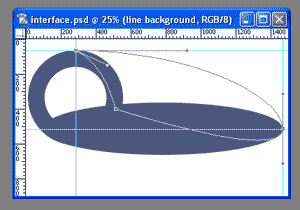
6. Make the Line Background Layer.
First, make the path:
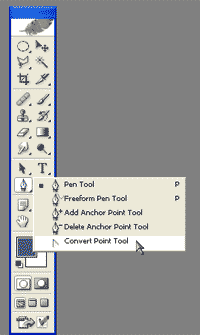
- Choose the Pen Tool (not the Freeform Pen) from the toolbox.
- Click it on the top of the bezel, then the right end of the ellipse.
- Click it then inside the figure (as shown below) and then back to the top of the circle.
|
|
|
|
Now, adjust your path to give it the right curves:
- Choose the Convert Point tool from underneath your Pentool.
- Click-Drag on each of the anchor points in turn, till you get the shape you want.
| Note: The shape doesn't have to be perfect, because we're going to have the left and bottom covered by the rest of the shape. |
|
Tip: Everytime you click the Convert Point tool, it will change your point back to a corner point. If you want to adjust your handles after you have pulled one out, you can do this with the Direct Selection Arrow. Hold Ctrl to get that whilst you are using the Convert Point Tool.
|
|
 |
 |
 |
|
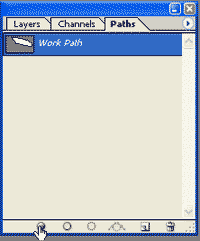
Fill the path:
- Make a new layer where you will put the fill for the shape you are going to form.
- Label this "Line Background."
- Then click the tab for the Paths palette, as I have to the right. Click the Fill Path button at the bottom of that palette.
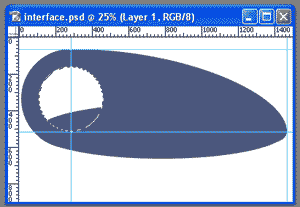
At this point, we have the circular bezel, the ellipse, and this Line Background layer. This will all go together to make the basic interface shape.
|
 |
7. Now fill that circle.
Since I have the bezel on its own layer, it will be much easier to select and fill that circle. Click the bezel layer in the Layers palette to make it active.
Choose the Magic Wand. Be sure that Use All Layers is UNchecked. I want to select the inside part of the circle, but I don't want PS to choose just the area that shows as white. Tap the wand inside the circle.
|
 |
| Make a new layer. I'll fill this with a white > gray radial gradient for now.
Whilst we have this selection going, click the Ellipse layer and delete that piece from there. We don't need it.
Ctrl-D to deselect.
|
 |
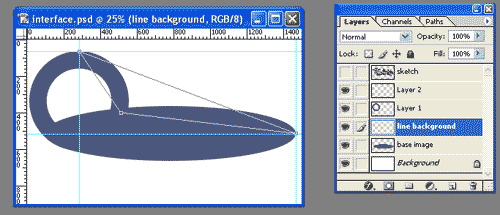
8. Make the pattern for the silver lines.
- Make a new layer. Zoom in tightly. I like doing this at 1600%, so I can see what I'm doing.
- Use gray and the pencil or a 1-pixel brush to paint 5 pixels vertically.
- Turn off the background layer, so all you see is the mark you just made.
- Choose the Rectangular Marquee with Feather set to 0 and make a small selection encompassing these 5 pixels and about 10 pixels below them.
- Edit > Define Pattern. Name it TV lines. Ctrl-D to deselect.
- Now delete this layer you just made and turn on your background visibility again. This was just to make that pattern.
- Double-click the Zoom Tool in the toolbox to take your view back to normal zoom.
|
 More on making line patterns More on making line patterns |
|
9. Make the silver lines.
The Line Background layer is the "base shape." That is, we will use that shape to fill with our lines.
- Ctrl-click the Line Background layer to load it as a selection.
- Make a new layer and label it "Lines."
- Edit > Fill ... and choose Pattern. Find your TV Line pattern, and press OK. Tada! Lines!
- Ctrl-D to deselect.
|
|
|
- Trim the lines now. Click the Lines layer in the Layers palette to make it active.
- Ctrl-click the bezel layer and hit Delete.
- Then Ctrl-click the Ellipse layer and again hit Delete.
- Drag this line layer to beneath the other interface layers in the Layers palette. Where did they go? Don't panic. They're still there, just covered by that other layer!
10. Cut the lines out of the blue part.
Ok, now I will want this blue part to look like plastic, eventually, and I want the lines to look like they are cut out of it. I'll accomplish the sculpting with Layer Styles, so I need to actually cut the lines from the interface.
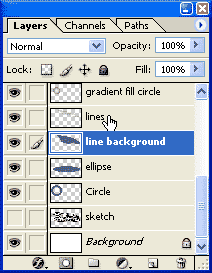
- Click the Line Background layer to make it active, as I've done to the right.
- Now Ctrl-click the Lines layer to load it as a selection.
- Hit Delete. Ctrl-D to deselect!
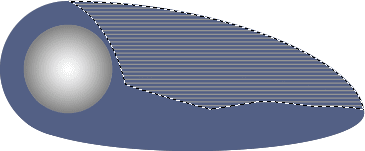
This cuts the lines out of the Line Background layer, making silver lines visible!
|
|
|
|
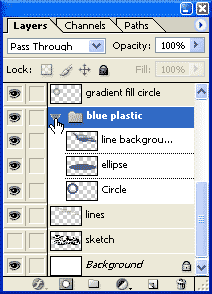
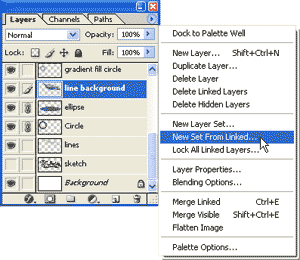
13. Make a duplicate Layer Set from the Interface components.
I want to add some texture to the blue part of the interface, But first, I need to merge some of these layers. In case I want to access these layers later, I will make them into a Layer Set first.
|
|
Tip: Learn about Layer Sets
Layer Sets rule. If you have not yet worked with them, this is something that can change your life. Layer sets will handle it if you want to do any of these:
- duplicate a bunch of layers in a flash
- delete a bunch of layers
- move a bunch of layers above another bunch of layers in the Layers Palette
- be more organized with layers
|
|
|
Link the layers you want in the Layer Set and then, from the arrow at the top right of the Layers palette, choose New Set from Linked. My Layers palette looks like the one to the right, at this point.
|
 |
|
Now duplicate the Layer Set by dragging it to the New Layer icon at the bottom of the Layers palette. Easy as that!
From the flyout arrow at the top right of the Layers palette choose Merge Layer Set. Name this merged interface layer. I gave mine the clever name of Merged Blue Plastic.
This gives us one merged version of the "blue plastic" part of the interface, and one layered version. Turn off the visibility eye for the layered version. It's just insurance in case we need its components later.
On the Merged version, if you turn off the visibility of the gradient circle, you'll see that we still have that vestige of the ellipse hanging around inside the circle. Let's lose that:
- Ctrl-click the Gradient Circle layer to load it as a selection.
- Click the the Merged Blue Plastic layer in the Layers palette and hit the Delete key.
|
| Tip: When working with Layer Sets, clicking the little arrow to the left of the set icon displays/hides the layers inside the set.
|
|
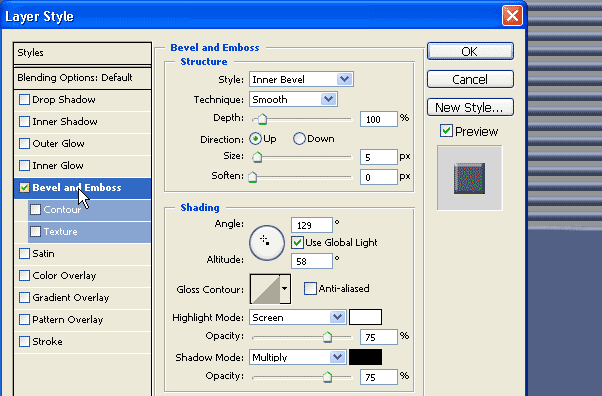
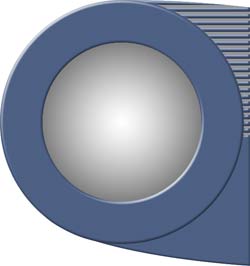
14. Give this blue plastic a real blue plastic look
Click the little  at the bottom of the Layers palette to bring up the world's largest dialog box, the Layer Style editor. at the bottom of the Layers palette to bring up the world's largest dialog box, the Layer Style editor.
I chose an Inner Bevel with a size of 5 pixels. My goal is to make those little lines look great.
|
|
|
|
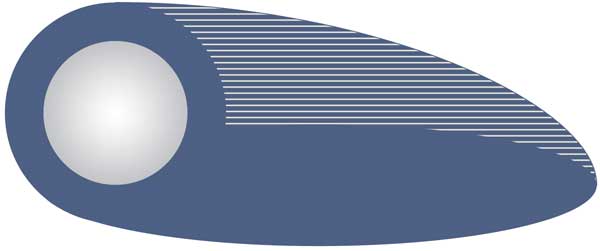
Here's the interface at this point:
|
15. Define the bezel.
To give the bezel some definition, we can pull its layer out of that Layer Set. Drag it from there up to above the Merged Blue Plastic layer.
Give it the same Layer Style as the Merged Blue Plastic:
- Right-click the Merged Blue Plastic layer in the Layers palette.
- Choose Copy Layer Style.
- Click the Bezel layer in the Layers palette.
- Right-click this layer and choose Paste Layer Style.
|
 |
16. Make a sculpted border for the interface.
There's just one more little thing that I want to do before leaving this page, and that's to put a thin sculpted border around the interface. Before you read how I do it, see if you can figure out a way to do it.
Here's how I did the border. Make the selection and then fill it.
|
Make the selection:
- Ctrl-Click the Blue Plastic layer to load it as a selection.
- Shift-Ctrl-click any other layers that need to be in this selection. You want the entire shape to be selected.
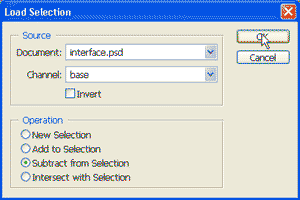
- Select > Save Selection. Name the selection "Base." This is now saved as a "new channel." We will use this in a second.
- Select > Transform Selection. This enables you to pull the borders of the bounding box outward, making your selection larger.
- Hit Enter to complete the transformation of your selection.
|
| Tip: Why not just Select > Modify > Enlarge?
Enlarging can sometimes flatten round parts and curve sharp corners. It can be unnoticeable for small differences, but with this, we want a nice smooth curve.
|
|
- Now we need to subtract that other selection, the one we saved. To do that, go back up to Select > and choose Load Selection.
- You'll get the box to the right, asking you which selection you want to load, and what you want to do with it! How handy is this? Choose Subtract from Selection and click OK.
Now fill it!
- Now that you have the selection, make a new layer, choose the color you want, and Alt-Backspace to fill.
- Ctrl-D to deselect.
Be sure to Ctrl-S (save your file!) before heading over to Part 2!
|
 |
|
|
This is a 6-part (now obsolete) tutorial. I'm keeping it just for historical interest. For Parts 2-6, use the Back button to navigate back here.
The link below (Return) will take you back to the myJanee.com Archival Tutorial Index.
|