Seventies
Trees
Straight
Lines
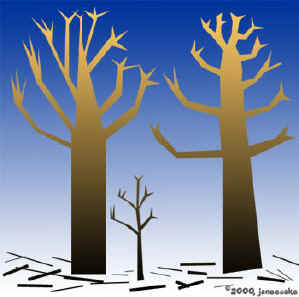
This picture may look complicated, but it is nothing more than straight lines! In this tutorial we will work with and learn about the following:
- The polygonal lasso tool.
- Polygon-shaped path with the pen tool.
- Selection from a path.
- Filling a selection.
- The line tool.
- Using a brush and a trick to paint a straight line.
- The gradient tool.
- Layer blending modes.
In this tutorial we will make two trees. The first will be made from selections and the second will be made starting with a path. Let's get started on the first!
|
This tutorial will work with any version of Photoshop. The part where you are using the pentool won't work with Elements, but the rest of the tutorial will!
I've used screenshots from v. 5.5, 6, and 7, but the important things should be evident.
|
| 1. Set things up:
a. File
-> New .. and make it 500 px by 500 px.
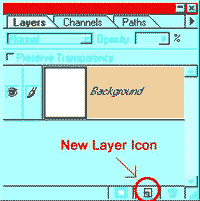
b. Make a new layer by clicking the new layer icon at the bottom of the layers palette.
|
 |
|
c. Type the letter D to make your colors the Default black/white.
2. We are going to use various methods to work with lines in this tutorial. For the first tree, we'll fill selections.
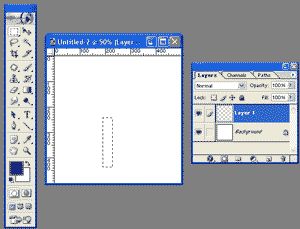
a. Choose the rectangular marquee tool.
b. Drag out a rectangle for the trunk of your first tree.
|
 |
c. Alt-Backspace
to fill the tree trunk with your foreground color (black). Ctrl-D
to Deselect.
File -> Save As .. and choose a name and path for your file. Leave it in .PSD format. It is always good to save your work as you go along, and PSD format is the way to do it.
|
|
d. Next we are going to do branches for the tree. This is a "winter in southern Indiana, USA tree" that i'm making. If you have palm trees where you are, just don't tell me about it.
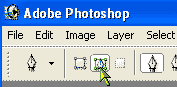
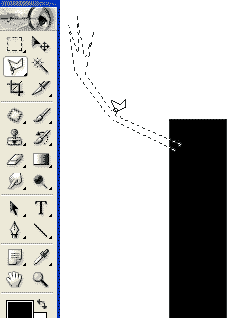
e. Choose your Polygonal Lasso tool . It is in the flyout under your Lasso tool.
(Click and hold the Lasso tool in the toolbox to get the Polygonal Lasso. Any tool with a little tiny triangle to the lower right has other tools underneath it!)
f. Click your mouse where you want each of the corners to be for your first branch. Double-click to close the selection.
g. Alt-backspace to fill it with black. Ctrl-D to Deselect.
h. Repeat to make several branches.
|
 |
|
Ctrl-S to Save.
|

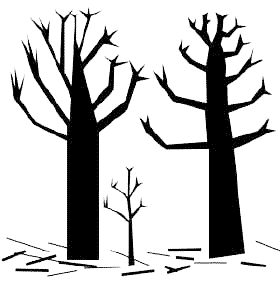
Isn't she a beauty? |
3. Next let's do another similar tree, but for this one, use the pen tool.

a. First, if you are using PS 6 or newer, you have to set your Pen Tool's options. In the Options bar, choose Path in the first set of buttons....
and choose Add to Path in the rightmost set.
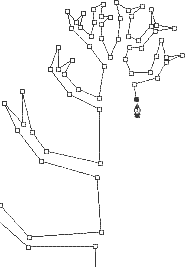
b. To use this tool, you don't drag your pen, as you might think. Instead, click on your canvas wherever you want a vertex, that is, a joining of two segments. The tool will fill in the segment in between.
You can either tap out the path for the whole tree, as i've done, or you can do one branch at a time, as you did with the first tree.
|
|
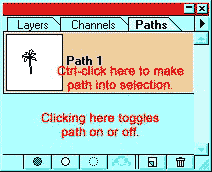
| c. Click the Paths Tab to work with the Paths Palette. Ctrl-click in the path in the palette to make it into a selection. (See at left.) This turns your path off too, getting it out of your way.
(You can also make the path into a selection by clicking the "Make Path into Selection" button at the bottom of the Paths palette.)
Note that you don't have any actual pixels for your 2nd tree. This is just a selection. You'll fill it with pixels in just a second, but first, make another layer...
|
 |
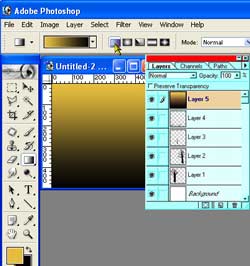
| d. Return to your Layers Palette and make a new layer by clicking the New Layer icon at the bottom.
e. Fill the selection as you did with the tree selection you made above.
f. Ctrl-D to deselect.
You should have two trees, each on its own layer. (I was having so much fun that I made a third smaller tree, too. :))
g. Why do you use a separate layer for each tree?
- Well, choose the Move tool. Drag it around, to reposition your tree.
- Now Ctrl-T (or Edit > Free Transform) to bring up your Transformation handles. Hold Shift (to constrain proportions), and Drag this tree a bit smaller. Hit Enter to complete the Transformation, or ESC to change your mind.
Ctrl-S to Save.
|
 |
Tip: Moving objects.
If you hold Ctrl, whilst you are working with the Move tool, you can click any object on any layer, and you will jump to that layer, so that you can reposition that object. This is very handy, if you are working with many objects, each on its own layer! |
|
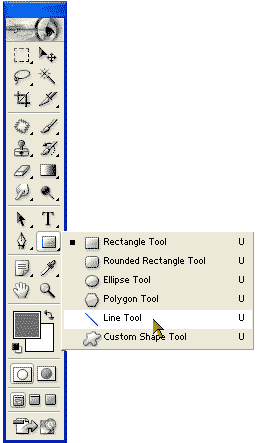
4. An exercise in lines would not be complete without using the LINE tool. I'm going to use the line tool to put some branches on the forest floor.
a. In the options palette, choose Fill Pixels and choose the pixel width for your lines.
b. Drag out a few lines to be twigs.
For more on the line tool and other shapes in PS6 - 7, see "Get into Shape."
Ctrl-S to Save.
|
 |
|
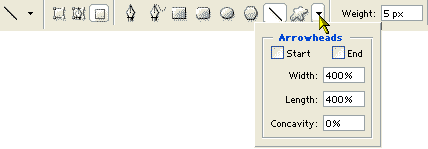
Tip: Making Arrows.
In the Line tool options, you can put arrowheads on your lines!
|
|
Tip: Another way to make lines.
Now, as an aside, I'm going to show you a trick. It is probably actually a "technique" but since I just found out about it, I consider it a trick.
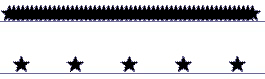
Suppose you want to make a line of STARS. Here is a quick way.
- Choose your painting tool, in this case the paintbrush.
- Choose your brush and color.
- Click your brush at the beginning of where you want your line.
- Hold Shift and click the ending point. Shazam!
The first example to the right is with the default spacing (under brush options) of 25%. The second line of stars is with spacing set to 300%.
In PS6 - 7, the brush spacing is in the Brush Options in the Brush Options palette. Click the picture of the brush itself in that palette (not the arrow beside it; that is where you pick what brush.
In PS 7, you change spacing in the Brush Options, by clicking the words Brush Tip Shape.
|
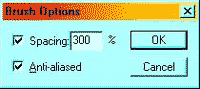
This is what the brush options look like for the star brush in v.5.5.
|
5. Ok, I promised you we would do something with a gradient, so here you are, a cool special effect!
a. In the layers palette, make a new layer, by clicking the new layer icon and then drag this new layer to the top of the stack, above everything else.
b. Make your foreground color a light yellow-orange and your background color black.
c. Choose the Gradient tool and set your Options:
- In the spirit of the topic, choose Linear Gradient.
- Make sure your gradient is going Foreground to Background.
- Check that you don't have "reverse" or some other mode than "Normal."
d. On your new layer, with the linear gradient tool, drag a gradient from the top of the canvas to the bottom.
If you hold shift while you drag, your gradient will be perfectly "square".
|
 |
| 6. At this point you are thinking, "Oh great! Now we have ruined our beautiful tree work!"
Not so! First, since we have done this on a separate layer, we could always just toss it if we don't like it. Secondly.. we are about to do something cool.
a. In the Layers Palette, there is a drop-down box with "Normal," "Dissolve" ... and other things. At this point it says "Normal." Change it to "Exclusion."
b. Be sure to Ctrl-S to Save before you run to show everyone how cool this is.
To save to jpg format, File -> Save as... OR File -> Save for Web if you are going to email this or use it on the web.
Do not flatten your psd file. Keep it as it is, because in this format it will retain its quality no matter how many times you save.
I hope you enjoyed this tutorial. :)

|
|
|
|
| Student Work:
|
|
|
RETURN to Janee's Tutorial Index
Ask tutorial questions in the Message Board or email me!

|
|
|
| All material in this site is ©2001 - 2003 by myJanee.com Graphic Creations. No part of it may be used without my written permission. If you have questions or comments about this site or its construction, contact Janee at myJanee.com Graphic Creations, 7193 W Gifford Rd, Bloomington, Indiana, USA 47403 or go to my Contact page for emailing instructions. See Privacy Statement here. |
|
|
|
|