Postcard Text I Postcard Text I
Janee's Brute-Force Method
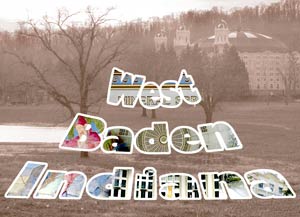
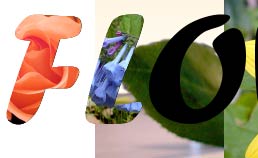
I call this "Postcard Text" because of those ubiquitous postcards with the location spelled out in pictures. It makes for a cool effect which can be useful for many applications. There are probably many ways to do this, but in this group of three tutorials, we will go through three of them. Each way has advantages in certain situations, and each way offers a neat little point or two to learn about Photoshop.
This tutorial was written with beginners in mind, though i hope that you will find it interesting even if you are a more advanced user. As we do our "postcard text," we will explore a bit about how layers work. Along the way, you will also learn to use some other handy techniques:
- Making images from several files into layers in one file.
- Working with the Layers Palette to rearrange the order of your layers.
- Change the appearance of your Layers Palette.
- Use the Type Tool to produce some text.
- Change the size of an image.
- Select with the magic wand.
- Trim a letter with a selection.
- Fill a selection.
- Stroke a selection.
- Use a Layer Clipping Group.
- Use "Paste Into."
|


Brute Force Method
This is fine for when you have just a quick job to do and don't remember right off how to do the other methods.
Clipping Group Method
This is probably best when you have ONE picture or composite to go behind a block of text.

Paste Into Method
This is the easiest way to handle pasting different pictures into different parts of the text.
This tutorial was written with screenshots from Photoshop Version 6.01. Everything here can be done with PS version 5.*, though the screenshots may be slightly different.
|
| Brute Force Method. My default method for doing anything is the Brute Force Method. This means using intuitive means to isolate and solve the problem, regardless of whether it is the easiest or most elegant solution.
There is a lot to be said for the Brute Force Method of problem-solving in that it reinforces your gut instincts about how things should work, it generally WILL work predictably, and the steps become almost automatic after you do it a few times.
The disadvantage to this method is that, especially if you are dealing with the same problem again and again, you can waste a good deal of time with inefficient repetitive maneuvers.
We will do this flower postcard using Brute Force. This will give you a bit of practice with layer operations and a really intuitive idea about what we are doing here.
|
For this exercise, you will need a photo for each letter of the text you are going to use. If you are going to do "Janee" in flowers, you will need, for example, 5 images of flowers. You may want a background image as well, as I have used above in the West Baden card.
(If you want to use my flower photos, you have permission to use them solely for the purpose of completion of this assignment, and if they are to be published in any form, they must be accompanied by my copyright ©2001, myJanee.com.)
Janee's Flower Photos
|
| 1. File -> New .. It is always a good idea to make your file big. It is easy to resize smaller, but resizing bigger will almost always make your work pixelly. I've made my canvas 1500 x 1000 pixels and made my dpi at 150 ppi. (For web use, use a dpi of 72; for printing, usually 300 is the best you ever need.)
If you want it smaller, that's fine, but 700 x 500 would probably be a minimum. Name it something suitable. I named mine "picletters."
|
|
| 2. Open all of the files you are going to use for your filler pictures inside your letters.
3. Choose your Move tool from your toolbox and, one at a time, drag your flower images onto your new document. Drag the image itself, not the title bar for the file. This copies the image into your new document.
(Note: If you are moving a gif file into your RGB document, you will see that it doesn't go. While your gif file is active, you need to go to Image -> Mode .. and make it RGB before it will work.)
Your layers palette should look something like mine below.
Ctrl-s to save.
|
|
4. At this point it is helpful to have all of your filler images in order of how they will go into the letters. In the layers palette, you can click and drag your layers around. Make it so that the top layer, the orange rose, in my case, is the one you want filling your first letter, and so on, till the last image is the one you want to fill your last letter.
|
If your images are hard to see in the thumbnails in your layers palette (see above), then you can click that little black arrow at the top right of the palette and change your palette options so you can have bigger thumbnails! They thought of everything!
|
|
|
| 5. Choose the Type tool and click on the "Create a Text Layer button to the left of the options bar. Choose a font and a size (or you can do that after you type your text.)
Click on your canvas and you will get a cursor. Type your text. Now click the type layer in the layers palette to commit your text. This just makes it so that you can change the font and size and stuff. It isn't really a *committment.* :)
|
Click on the font NAME in the options bar and then use your up and down arrows to scroll through your fonts till you find one you like. You can do the same for the sizing of the font, but you have to click the type layer in the layers palette after you change the number each time to see the resulting size. Drag your text layer to the top in the layers palette, unless it is there already. :)
Ctrl-s to save.
|
|
|
| 6. Now we will make the details of the rose fit more closely into that F. Click the rose layer in the layers palette to select it.
Then Ctrl-t to bring up Free Transform (or Edit -> Free Transform). This gives you a bounding box like mine to the right. Hold shift to keep your proportions intact and drag one of the corners till most of the details of the rose are covered by the F as i have done to the right. Click Enter to apply the transformation.
|
 |
|
7. Trim the excess off the rose as follows: Click on the type layer in your layers palette. Choose your magic wand tool and with contiguous checked, tap it on the F. This makes your selection ants begin to crawl.
Click back on your rose layer in the layers palette and then Select -> Inverse .. and hit the Delete key. Ctrl-d to deselect. Yikes! Where did the rose go? Drag the rose layer up above the text layer in the layers palette! Tada!
Ctrl-s to save.
|
 |
|
8. Now this is where the repetition comes into play. Repeat the steps you did for the F with all of your other letters. Take your time and try to keep your layers in order. As you trim each letter, drag it up above the text layer so you won't forget where you are!
Resize.. select.. trim.. move layer above text. Save.
With the second letter, look at the tutorial as you need it. With the third, try NOT to look at the tutorial. The practice you get with this will help to make some of these commonly-done functions more natural to you.
|
 |
|
|
| I hope you enjoyed making this Postcard Text with me and I invite you to check out Parts 2 and 3 of this tutorial next, to explore some other ways to put pictures into your text!
 Postcard Text 2: Using a Layer Clipping Group Postcard Text 2: Using a Layer Clipping Group
 Postcard Text 3: Using Paste Into Postcard Text 3: Using Paste Into
|
(For my "Flowers" up at the top, I did some extra things. First I did the glassy look with a reflection which i did as follows: I added another layer above the flower layers. Then I cntrl-clicked the Text layer in the layers palette to make all the letters active. Then, with a 40-pixel wide paintbrush set on "wet edges," i did a little white swath across the tops of the letters.
For the border, with the selection still active, I added another layer UNDER all of the flower layers. Select -> Modify -> Expand.. and i think i used 10 pixels or so. Choose a very light yellow for the foreground color and then alt-backspace to fill the selection.
Now with this new selection still going, I chose a light bright green for the foreground and then Edit -> stroke .. center.. and 2 pixels. Ctrl-d to deselect.
A drop-shadow on this layer finished the look.
|
|
|
| I hope you enjoyed learning this "Brute Force" method of filling text by doing this Postcard Text!
Always me,

For more pictures inside text, see these other 2 tutorials:
|
|
|
Postcard Text 2: Using a Layer Clipping Group
Postcard Text 3: Using Paste Into
|