Saving for the Web Saving for the Web
Saving for the web is a very handy little feature in the newer versions of Photoshop. The screenshots for this tutorial were done with v. 6. Save for web is good for making JPEGs or GIFs at 72 ppi, the standard image formats for webpages, and is good for emailing images.
|


|
|
This tutorial is written for beginners, but even if you are no longer a beginner, read on! You may learn something.
|
|
If you are planning to print the image you are saving, you will find 72 dpi disappointing. If you are printing the image, instead of Save for Web, use Image -> Size, and change your ppi to 150 - 300 (Uncheck resample unless you are making the image larger). Then use File -> Save as.
|
|
|
When you have your psd file ready to save, here's what you do:
1. Save it in its layered format as a psd, if you have not already done so. (File -> Save As... and find a good place for it and name it.)
NEVER flatten something unless you are SURE you are never going to want to edit this image again. Flattening is forever!
2. File -> Export -> Save for Web (Legacy) .. (or alt-shift-ctrl-S .. not as hard to do as it may seem, since all of the keys are right there together.)
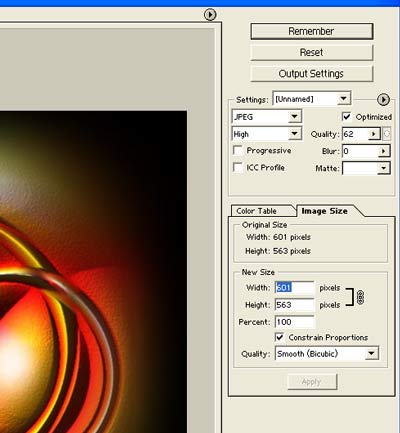
You will see the dialog box for Save for Web and it looks something like the one I have here.
|
 |
|
|
|
Take a good look at the Save for Web dialog box above. At the arrow in the bottom left of this box, you see the file size and this will change depending upon what you saving options you choose.
In this window, you can do some "what if" analysis and decide, based on what your preview image looks like and your resulting file size, in what format you want to save your image.
In each of these following steps, which I will detail in the coming paragraphs, you will be looking at the effects on file size and image quality.
3. Choose a file format.
4. Choose an image size at which to save your image.
5. Choose a quality level for jpg or number of colors for gif.
6. Choose a location for your file on your drive.
|
|
In the real world, we usually have to strike a balance between image quality and file size. We can't have the best quality in our images for the web because people won't stick around to wait for an image that takes too long to load. Similarly, your friend to whom you want to email a photo will not appreciate your clogging up his mailbox with a picture that has an unnecessarily large file size.
|
|
|
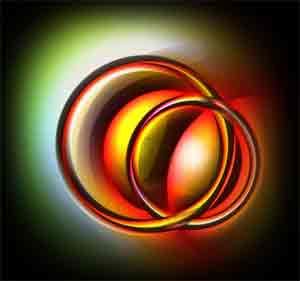
You want to save in JPEG Format if your image is one that has lots of gradations in color, as in this "Wedding rings" example, or as you will have in most photos.
Choose JPEG in the box and then adjust your quality setting. Click that little arrow just to the right of the quality number to get the quality slider. Pull it down to a low number and look at your image. Then drag it higher and look for the quality differences. (See my examples just below.)
Also note how your file size changes when you adjust the quality setting.
|
|
|
JPG quality level 0 -- 5.5K
|
JPG quality level 61 -- 19.5K
|
|
If you click on the "Image Size" tab (See below), guess what? You can change the size of the image! <g>
Actually this is cool because you can change the size of the image just for this copy of the file you are saving. Changing the image size in this window does not change it on your original document.
|
Reducing image size is a very effective way to reduce file size.
This is also where you make a thumbnail. If you want to make your thumbnail's maximum size be 100, for example, just plug in 100 for your larger dimension. If "constrain proportions" is checked, your smaller dimension will fill in automatically!
Click Apply to see the effects of the image size change in this window.
* For special Challenge how-to's regarding image size, see at the bottom of this page.
|
|
|
|
Now try something else. Click on that arrow just above where it says "optimized" and choose "Optimize to File Size."
|
 |
|
|
This is where you put in 60 if you want your file size to be as close to 60K as possible without going over!
After you are finished establishing image size and quality, Click OK in the Save for Web dialog box. Choose a fitting location for your file, and you are done!
|
|
Saving in GIF Format.
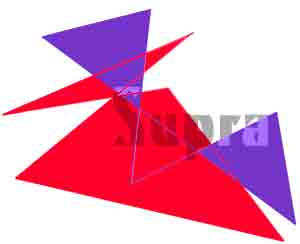
If your image is one that has a limited number of colors and clear demarcations between the colors, like a 2-color graphic with limited gradations or text or a simple screenshot as just above, GIF is is usually better. It is not "lossy" as is JPEG because it doesn't compress the same way that jpeg does.
GIF is also the way you get a "transparent" look to a graphic. I'll talk about that in the second part of this tutorial..
|
 |
|
If you choose to save your image in GIF format, you will then choose how many colors you want in the image and the size of your image.
Click on Color Table in the lower box and see what colors you are using. In the little box above where it says Colors, I've chosen 32. Check the file size in the lower left and make that number smaller. At the same time, notice what fewer colors does to your image.
|
 |
|
|
|
|
In this image above, since there are a limited number of colors in use, GIF format works well and I was able to get a file size of 3.4K with 8 colors.
|
Saving the same image in JPEG, this is the best I could do with a file size of 3.8K! Ewww!
|
|
So what happens when we try to save an image like the wedding rings, with lots of gradations of colors, as a gif?
Even just using 8 colors (shown below), the file size is 15.9K, nearly as big as the quality 61 jpeg above, but my image is pixelly and banded. This is a perfect example of a picture that I would choose to save as a JPEG.
|
 |
|

Transparent GIF's will be discussed in the next part of this tutorial.
|
 |
|
I hope you enjoyed this tutorial!

|
|