Sepia-Toning a Photograph Sepia-Toning a Photograph
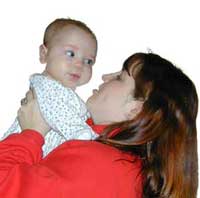
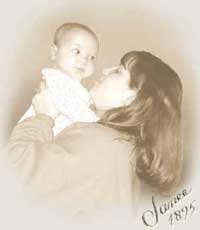
In photo work, it seems as if we are always trying to make the old new again, and the new old. In this tutorial, we will give that 1895 sepia look to a new photo.
As you work through this tutorial, you will gain some confidence in using effects to change a picture. You will also learn these:
- Using a layer mask to remove a background from a subject.
- Using a Hue/Saturation Adjustment layer to change the color of a picture.
- Using a Levels Adjustment layer to change lighting.
- Changing a background.
- Adding shadows to a picture.
- Painting on a layer mask to make a vignette.
I used PS Version 6 for this tutorial, so the screenshots are version 6, but PS 5.* and 7+ will work fine too! If you have a good grip on the Elemask, you can do this tut with PS Elements 2.
|

|
|
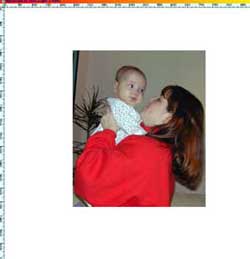
You can use this photo if you want, but it would be better to use your own. With your own photo, you will learn more and end up with a neat picture that means something to you!
If you want to use my photo, click on this one to get the bigger version. Right-click it and then choose Save As.
|
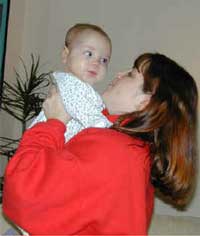 |
| Drag your photo onto a larger canvas. In old portrait photos, the background was often very plain. They almost certainly would not have had carpet and a plant like this in their background, so the next thing to do, if your background is complex and inappropriate like this one, is to get rid of it!
Click File -> Save As.. Choose .psd format, find a sensible place to put the file, and give it a name.
|
 |
| 2. First we will remove the old background, and then we will put in a new better background later.
Click the Add Layer Mask button at the bottom of the layers palette. See the white square that appeared next to the layer in the Layers palette? That's the Layer Mask. We are going to paint on this mask, and this will paint away the background! Very powerful stuff! So grab a brush and, with black for your foreground color, have at it! Here are some tips:
- Zoom in, especially when you are close to your subject.
- If you have large areas to fill, you can select using the lasso (or other selection tools) and fill with black, by Alt-backspacing.
Ctrl-S to Save.
|
 |
|
|
Digression:
There are usually 3 ways to do anything in Photoshop, and, as you learn your way around in the program, you will see that there are benefits to some methods, depending upon your particular project.
For Sepia-toning, the three ways I can think of right off are these:
- Use the menu command (Image > Adjustments > Hue/Saturation).
- Put the image into Duotone mode. (Change the mode to Grayscale (Image > Mode > Grayscale) and then Duotone (Image > Mode > Duotone).) This would be better, perhaps, for printing work where you have certain inks that they are going to use.
- OR.. and here's what i recommend for us here... use a Hue/Saturation Adjustment Layer.
|
|
Click the Create a New Adjustment Layer button at the bottom of the Layers palette. Choose Hue/Saturation.
We will do this by using an Adjustment Layer. This is a layer that you put over your image and it affects your image, without actually changing the image underneath.
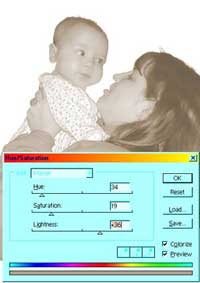
3. Next we will make that lovely sepia tone!
Check the "Colorize" box. Now here is the creative part. What color is sepia? Well... the answer is that it is a whole range of colors! The photographers of old had their own combinations of chemicals and so each photographer pretty much had their own signature sepia. You can have YOUR own signature sepia, too!
Here are the settings that I used here.
- Hue is about 34
- Saturation is about 20
- I adjusted the lightness higher, to wash it out a bit.
You can do that in levels too, as I'm about to do.
Ctrl-S to Save.
|
 |
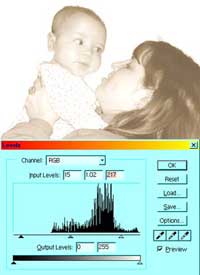
| 4. Turn-of-the-century photos were a bit more contrasty but lighter than we have after step 4 (at least in my example). If yours needs lightness adjusting without just adding white (as the Lightness slider does in Hue/Saturation), then use Levels.
Again, we can use an Adjustment Layer. Click the Create a New Adjustment Layer button again and this time choose Levels. I have shown here what my sliders look like. Play around with them till you like the look.
Ctrl-S to Save.
|
 |
| 5. Now to put in a background! Click the Create a New Layer icon to make a new layer and drag it beneath the masked layer where your subject is.
Type I for the eyedropper (get it? I = "I"-dropper? Aren't they clever?) Click on your picture to pick a medium shade from it, and Alt-Backspace to fill the background layer.
6. It is looking pretty good, but not quite done. It is just too perfect. We need some shadows. Also, we need a vignette sort of look to soften the hard edges.
Also, if your subject is standing out too strongly against your background, you may want to soften the edges of your mask a bit. I like to do this by using a light touch of blur tool with a small black soft airbrush along the border of the mask (Click the mask in the Layers palette to work on it).
Ctrl-S to Save.
|
 |
| 7. Make a new layer and drag it to just above your background layer, but beneath your subject layer in the layers palette. Click the foreground color in the toolbar and then, using the eyedropper, find the darkest shade on the subject and click. This will make that color into your foreground color.
Using a broad soft brush, with the flow set low, and a very light hand, spray some shadows around the lower part of your subject. (This is where a tablet with sensitivity controls comes in VERY handy. My weapon of choice is the Wacom Intuos 6x8. ;))
Ctrl-S to Save.
|
Digression:
Ok.. so what's the big deal about Adjustment layers, anyway?
Well, try this! Double-click the icon for the Adjustment layer you made above for Hue/Saturation (not the mask). Now you can adjust the changes you made! You can even throw out this layer, color your picture green... Let freedom ring!
Hit cancel on this window after you are done playing with it, and it will revert to the way you had it.
|
| 8. Now for the vignette effect for the border. Make another layer and drag it above the subject in the layers palette. This time, choose a color that is one of the lighter ones in the subject.. or at least lighter than the one you have for the background.
With your new layer selected in the layers palette, click Alt-Backspace to fill the layer with your foreground color.
Don't panic! Your subject is not gone! <g> Click the layer mask icon at the bottom of the layers palette and then with a soft black airbrush, paint out the center of your mask. Tada!
If you are doing this the same way I am, your layers palette should look similar to mine, shown here.
Ctrl-S to Save.
|
 Here, the layer above the background is just a copy that I made whilst putting the tut together. The visibility eye is turned off. You won't have this layer, so don't be confused. ;)
|
| Save the psd before you crop it smaller or reduce the size at all. Then click File -> Save As.. name it something else, and THEN reduce it or flatten it or crop it or whatever.
When you are ready to save your final result, click File -> Save As (or File > Save for Web) and choose your format.
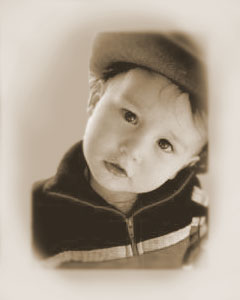
I hope you enjoyed this tutorial and learned a few things along the way!

|
|
Student Work:
|
|
|
RETURN to Janee's Archive Tutorial Index
email me!
Ask tutorial questions in the myJanee.community:

|
|
|
| All material in this site is ©2001-2003 by myJanee.com Graphic Creations. No part of it may be used without my written permission. If you have questions or comments about this site or its construction, contact Janee at myJanee.com Graphic Creations by email. |
|
|
|
|