Home myJanee.com Archives Janee's Photoshop Tutorials myJanee.com Art Challenge myJanee.community Janee's Galleries All Things Janee Contact Janee

myJanee.com --> Photoshop Resources --> Janee's Archive Tutorials -> Using Photoshop's Filters

Reflections in Sunglasses

As you build custom reflections in your sunglasses, you will learn some neat things about using Photoshop:

  • Dragging one file as a layer onto another file.
  • Duplicating a layer.
  • Resizing a layer.
  • Using the spherize distortion filter.
  • Adjusting opacity of a layer.
  • Using the pen tool to make a selection.
  • Making a selection into a layer mask.


Bunny at the Pacific Ocean!

Ocean view off the coast of San Simeon California. I will use this photo for the reflection in the bunny's glasses.

This is the photo with which i will work, making the ocean reflections in his glasses.

1. Open your reflection picture (mine is the ocean.) and your sunglasses picture. Drag the reflection picture onto the sunglasses picture. In the layers palette, drag the reflection picture down to the new layer icon to duplicate it. Turn off the eye on the duplication. We won't need it unless we mess up on this.

Think of a name for this file and then File -> Save as and name it. Leave it in psd format.

Drag the reflection layer to the new layer icon in the layers palette.

2. Edit -> Transform -> Free Transform and reduce the size on the reflection picture till it is about the size that it will need to be. It won't matter if the proportions get a bit skewed at this point because you are going to skew them worse in a minute! Hit the Enter key when you get your sizing close.

3. The reflection will need to be distorted to reflect the curvature of the glasses. Drag your smaller picture to the center of your canvas and then Filter -> Distort -> Spherize. You can experiment with different settings here. I used 100%. 

File -> Save.

4. Edit -> Transform -> Free Transform and this time, get the picture so that it fits as well as it can in both lenses. Drag it to the other one and make sure that it fits. You can mess up the proportions if you need to here. Sunglasses do that in real life, you know. <g> Click the Enter key when you are satisfied with your transformation.

With your reflection layers in their places, reduce their opacity so that you can see the sunglasses clearly.

5. Drag this reflection layer to the new layer  icon to duplicate it. Drag one to one lens and the other to the other lens.

6. Reduce the opacity of both reflection layers till you can clearly see the sunglasses under them.

File -> Save.

7. Now you need to make a selection from each of the lenses. You can do this using whatever selection tool works for your situation. Since my lens is a smooth rounded curve, I'm using the pen tool. First zoom in.  I have clicked around at the "corners" of the lens with the pen and then used the "convert point" tool, clicking and dragging along on each of the points in turn, pulling and pushing the handles till I get the curve fitting the way i like. This takes a bit of practice, but it is a good thing to be able to do. If you use the pen, you will get two lenses here on which to practice.  If you are using the pen tool, as i did, click on the paths palette and down at the bottom, click the "loads path as selection" button.

(For more beginning practice on the pen tool, see my Raindrops tutorial or my Heart 1 tutorial.)

making the path

Once you have made your selection, click the layer mask button and it makes this selection into a mask for you.

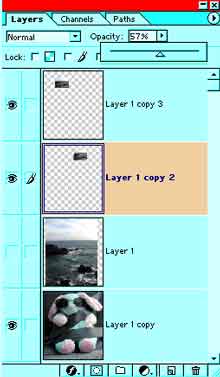
8. Once your selection is made, with the appropriate reflection layer selected, click the layer mask button  on the bottom of the layers palette. (highlighted in the diagram to the left) Shazam! This makes a mask from the selection. This way if your selection is not exact, you can fix it by touching up the mask. 

9. Repeat steps 7 and 8 for the other lens.

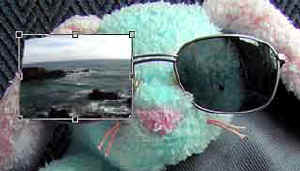
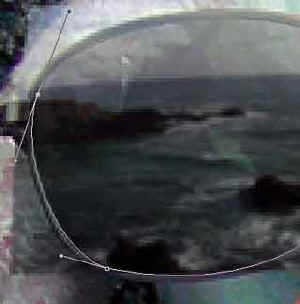
10. I'm going to paint a bit of black on the right lens to expose that bit of bunny fur that the reflection is covering. Click the mask in the layers palette to be sure that it is selected, and then zoom in and paint with the paintbrush. 

11. Make any final adjustments that you want to the opacity of the lenses. 

File -> Save.

If, at this time, you want to save this to send to your mom, choose File -> Save for Web and then follow that wizard to save it into jpg format. Do not flatten your image. Keep your psd file intact in case .. well you never know when you might need a bunny in sunglasses!


I hope you enjoyed this tutorial!

Always me, 
Always me, Janee


Bunny at the Pacific Ocean!

  RETURN to Janee's Archive Tutorial Index

email me!

Ask tutorial questions in the Message Board:

myJanee.com Message Board

All material in this site is ©2001-2003 by myJanee.com Graphic Creations. No part of it may be used without my written permission. If you have questions or comments about this site or its construction, contact Janee at myJanee.com Graphic Creations by email.