 Fading Images into One -- Adventures with Layer Masks Fading Images into One -- Adventures with Layer Masks
This is one tool that I put off learning about. It didn't make sense to me to put a mask on something so the name seemed stupid. I also thought that I didn't need these things to fade one picture into another as long as I had my soft-edged eraser!
Well, I guess I don't have to tell you that I finally discovered how handy layer masks can be. I use them a lot now, but I'm still discovering cool things that they can do.
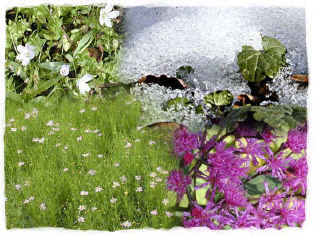
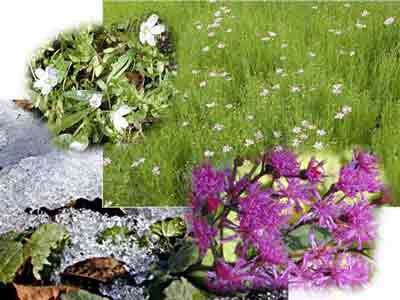
For this tutorial, you will need to dig out two or more images (photos or drawings) that you want to put together into one. I chose some flower pictures that I took that represent the four seasons here in southern Indiana (USA).
As you work through this tutorial, you will learn/practice several useful skills, including these:
- Bringing different pictures together onto one document.
- Applying a layer mask.
- Editing a layer mask.
|

This tutorial was written using Photoshop version 5.5. Directions are given for later versions. Your screenshots may very slightly, but I'll help you through that. :)
If you're using Elements, you'll be using the Elemask technique described HERE, and this changes things for you a bit. You'll have one Elemask layer grouped to each of your component images.
|
| 1. In Photoshop, open the pictures that you are going to put together into your new piece . I will be putting flower photos together for my "Seasons" montage. Any other number of pictures will work fine too.
2. File > New and make a new document. Make it larger than you think you need. You can always make it smaller in the end. Use your component picture dimensions as a guide.
3. Choose the move tool from your toolbox and drag the component pictures, one at a time, from their canvases onto your new canvas. Each will automatically form its own layer.
File > Save As ... and choose a name for your new file. Leave it in psd format.
|
|
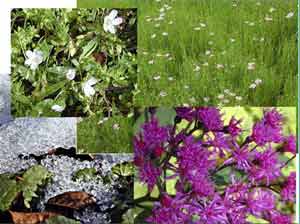
| 4. Arrange your pictures the way you want them. Do this by typing V for the moVe tool, clicking the appropriate layer, and dragging the pic where you want it.
It is even okay if your pictures are squarely atop one another. You definitely want them to overlap each other, though.
Ctrl-s to save.
|
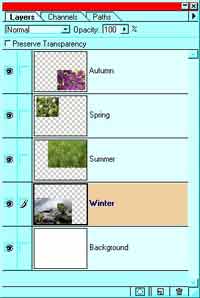 |
| 5. In your layers palette, at the bottom, you will see three little icons. (Actually, you will see 6 in PS versions 6 and 7, but the one you are looking for has a gray background and a white circle in the middle.)
With your topmost layer selected in the palette, click the Add Layer Mask icon.
See the white square that appears linked there with that first layer? When you click on that white box, you will get the little layer mask icon beside the eye (I put a dotted circle around it in my layers palette to the right.) This is the indication that you are about to draw on the layer mask and not your actual layer.
6. Choose a drawing tool. For this, I am using a large soft airbrush. Type D for the Default colors, black on white. You will be drawing on your layer mask with black.
Ctrl-S to save.
|
 |
| (Digression: Do this if you are new to layer masks.)
With your layer mask clicked in your layers palette, draw on your canvas with black. Just scribble.
Now when you paint on the canvas with black, you can see in the little white square that you are actually painting on your layer mask. Notice what it does?
You cannot hurt anything at this point, so play around here until you get a feeling for this.
When you paint on your layer mask, the black parts are covered up, while the white parts show through.
What would be the difference if you used a hard-edged brush instead of a soft one? Try it.
Choose the linear gradient tool, check the gradient options and be sure it is set on "Foreground to background" and drag a gradient across the layer mask on the canvas. You can do it over and over till you get it just the way you want it and you are not even touching your actual picture!
What happens if you fill the whole mask with BLACK and paint on it with white? Answer the question before you try it.
Ctrl-backspace to fill your mask with the background color (white) again before you continue on with Step 7.
|
 |
| 7. With the top layer selected, click on the Layer Mask, and ascertain that the layer mask icon is turned on next to the eye for that layer.
With the soft airbrush, draw on the layer mask around the perimeter of the picture to soften the edges. I used a medium soft airbrush for this.
8. For the "spring" layer, I made a layer mask for the 2nd layer. Then, using a soft airbrush, I painted around the border of "spring" as I did already to "autumn".
Ctrl-S to Save.
|
|
| After this step, I decided that i wanted to change the positions of winter and summer because I didn't like the way it worked the other way. I have to now blend summer and winter together seamlessly in the middle. I want no straight edges in my finished work and i want all the transitions to be gradual.
9. With the top of the two lower layers selected, summer, add a layer mask to it. I'm going to add a black to white gradient to this mask, experimenting till I like the results.
10. If you look very closely at the masks in my layers palette to the right, you will see that i did a bit of hand touch-up for the summer mask and the autumn one. This was to make the transition better to my eyes. I like having the flowers boldly colored right to the edge. :) I did this touch-up with a hard-edged brush.
Ctrl-S to Save.
Your results will vary.. i HOPE! The beauty of all of this is that you will come up with your own results. Practice these techniques and try different things.
|
 |
11. If you want to do a "painted edge" border as i have done, this is how you do it:
- Add a new layer. Drag it above the others in the layers palette.
- Choose white (or your background color), a hard-edged brush, and, in the brush options, choose an opacity of about 30%.
- Paint around the edge, taking pains to paint over all the straight lines till they are no longer visible, but not trying to be too neat otherwise. Experiment with this till you like your results.
Ctrl-S to save!
|
|
|
I hope you enjoyed this tutorial!

|
|
|
|
RETURN to Janee's Archive Tutorial Index
Ask tutorial questions in the Message Board:

|
|
|
| All material in this site is ©2001-2004 by myJanee.com Graphic Creations. No part of it may be used without my written permission. If you have questions or comments about this site or its construction, contact Janee at myJanee.com Graphic Creations by email. |
|
|
|
|
