|
|
Create a Post-It Note in Photoshop
|
 |
|
|
See my ALL NEW Post-It Note Photoshop Tutorial HERE!
This tutorial was written for use with Photoshop CS, but it can be done with earlier PS.
If you're on a Mac, remember that I'm using PC shortcuts. Ctrl on a Mac is the Command key, and so on. I have a "key" for the keyboard shortcut equivalents HERE.
This tutorial will enable you to make a Post-it Note like the one pointing to the Photoshop link on my bulletin board interface above. Along the way, you'll learn some things about using Photoshop:
- Using the Shape tool
- Modifying a Shape using the Pen Tools
- Making a Custom Shape Library
- Adding a Custom Shape to your Custom Shape Library
- Using a Shading Brush
- Making a realistic shadow
|
 |
1. Make the basic Shape
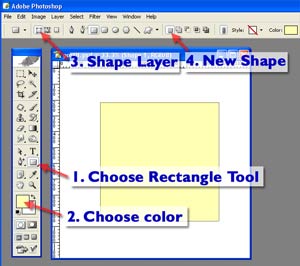
We're going to begin by making a yellow square, as you see on my canvas to the right.
- File > New. Choose RGB and 300 ppi (if you want to print this) or 72 ppi (if you're going to use this on the web). For Width and Height, I don't care. Just make it larger than you want your finished output, and mind your units (inches, pixels, whatever).
- Now follow my numbers on the image to the right:
- Choose Rectangle Tool.
- Choose color.
- Be sure that you have Shape Layer chosen in the Shape Options.
- Be sure that you have New Shape chosen in the Shape Options.
- And drag out your rectangle! If you want a perfect square, hold Shift as you drag.
- What do you notice about your Layers palette? Why did I not have you to make a new layer for this square?
(After you've thought about this, hover over the image to the right for an explanation.)
|
 |
2. Adjust the Shape
This is a pretty sad looking Post-it right now. Let's make it so that its bottom part curves out, as if it were stuck on our monitor. We'll do this adjustment using the Pen Tools.
- Choose the Add Point Tool.
 This is NOT the Freeform Pen, or any of the others there. This is NOT the Freeform Pen, or any of the others there.
|
 |
- Using this tool, click where we are going to want to anchor this path. You'll see what I mean by that in a minute. To the right is the path with one new anchor point added. Below, I've added 4.
|
 |
- Now we'll move those bottom four points, to make the note look "bent." Choose the Direct Selection tool
 . .
- Click-drag this tool as if you were making a rectangular marquee around all 4 of these points. After you release your mouse, the bottom 4 Anchor Points will be black, showing that they are selected -- ready for action!
|
 |
- With the same Direct Selection tool, drag the lower part of the note over to one side, as I've done to the right. When you release the mouse, the color will fill into the new path boundaries!
The Anchor Points that we added in the top row "anchor" the note to the wall where it is affixed. The bottom 2 give the note that characteristic bend.
|
 |
Optional: Make this into a Custom Shape
If you think you will want to make more of these at other times, or if you just want some practice working with Custom Shapes and their Libraries, follow along for this little digression.
a. Using the right Library
Before you define a new Custom Shape, you need to have open the Library where you want to ultimately put it. I like having a Library I call "Blank," to which I can add new shapes and then rename the Library. I go into the how-to details in this tutorial:
b. Define the Custom Shape
With your Path active, choose Edit > Define Custom Shape.
The Using and Creating Custom Shapes tutorial (just above) has lots of good info on creating shapes and then, importantly, saving them!
|
3. Make the "glue."
The good thing about Post-It "glue," is that it's barely there, but it does show just a bit, as a little darker area. We can make this happen with the Burn tool, right on the Fill layer, but it can be difficult getting this just right, and what if you decide later that you want the glue to be a little lighter?
It's just as easy to do this using another layer:
- Make a new layer by clicking the Create a New Layer button at the bottom of the Layers palette.
- Choose your Shading Brush. If you don't have one yet, it's time to make one! (See box below!)
|
 |
| Making a Shading Brush
This is a brush you'll use a lot. This will show you how to set the parameters the way mine are set for my own shading brush:
- Begin with a soft round brush. If you use a large size to begin with, you won't have to resize it much whenever you use it. I like 200 pixels for this.
- Choose black for your Foreground color in the Color Picker square in the Toolbox.
- Click the Brushes tab and the WORDS "Brush Tip Shape." Set Spacing to 28%.
- Now, in the Options bar at the top, set Opacity to 100%.
- Set Flow in the Options Bar to 28%.
- Turn ON the option for Airbrush in the Options bar.
Now we're ready to save the Shading Brush:
- Click the arrow for the Tool Preset picker.
- Click the New Tool Preset icon at the top right.
- Name your brush. Since you'll be using this often, keep it near the top of your list, by naming it something like "AA Large Shading."
- In that box, tick the Include Color button, so that black will automatically come up for it. (That's optional.)
- Finally, hit the flyout on the Tool Preset Picker box and choose Save Tools. Name your file and you'll have this tool collection saved for eternity!
|
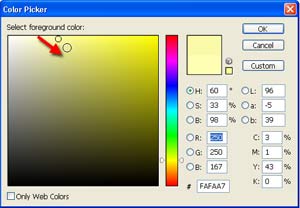
- Now, we're going to use a different color than the black. Click your Foreground Color square in the toolbox and choose a color that's just a little down and to the right of your original note color.
|
 |
- Ctrl-click the Note layer's Vector Mask (shown at right). This will load the mask as a selection, enabling you to easily stay between the lines, when you paint!
- Make a new layer above the note layer and paint in your glue. (also shown at right!) Because you have that airbrush option chosen, the longer you leave the brush on one spot, the more paint will build up there. Also, you may want to make more than one stroke, till you get it right.
- Lower the opacity of the glue layer if you need to.
|
 |
Tip: You don't have to use the dropdown slider for many of the settings, like opacity. You can either click-drag the word, as I'm doing at the right, or you can type 5 for an opacity of 50.
|
 |
|
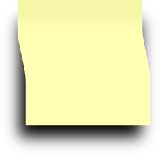
4. Make the shadow
- Make a new layer beneath the Note layer and label this "Shadow."
- Use the Rectangular Marquee to make a square about the size of the note's square.
- Fill this with black. (Type D for Default colors, and then Alt-Backspace.)
- Filter > Blur > Gaussian Blur.. and choose a setting that makes your blur look shadowy. This will still look pretty bad.
|
 |
- Choose your Eraser tool. Change your settings so thaat they are similar to your Shading Brush (above). I saved this as a preset for my Eraser tool, calling it my AA Easy-does-it Eraser.
- Use this eraser to gradually lose the extra shadow. In particular, you want the shadow to be gone on the right side of the note, and you want it to taper in toward the top part of the note.
| TIP: If you're having a hard time visualizing what a shadow will look like, grab a flashlight and a real Post-It note (or whatever sort of object you're working with) and LOOK at the shadow! |
|
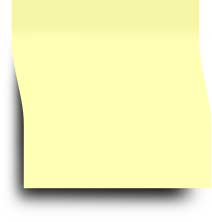 |
- You may need to reduce the opacity of this shadow layer, depending upon how much light you're depicting.
|
|
I hope you enjoyed this tutorial!

This tutorial was translated into Finnish! Check it out on Sahanya's site!
|