 Hearts -- Heart 4 Hearts -- Heart 4
In this tutorial, we are going to use the pen tool and alpha channels to create the 3D-looking heart above. This tutorial assumes only minimal knowledge and you should be able to work through it even if you are a beginner in the use of Photoshop. Through this tutorial you will learn and practice the following:
- Using the freeform pen tool.
- Making a simple texture.
- Using alpha channels to hold a selection.
- Using alpha channels to render a texture using lighting effects.
- Transforming a selection.
Though this tutorial was written with version 5.5, most of it is the same or very similar in version 6. Where i thought it necessary, i have put special version 6 instructions in parenthesis in purple.
|
|
| This starts out with the same few steps as Heart 3.
1. File -> New. Be sure you are in RGB mode. The size of your file doesn't matter, but i made mine 600px by 600px. Now to make your Texture Channel, which will be a blurred and trimmed heart.
a. To make a new channel, click on the Channels Palette and then click the New Channel icon at the bottom. (See at right.)
|
|
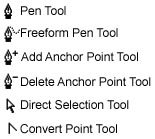
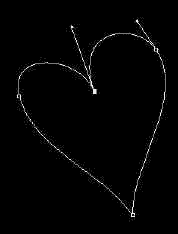
| b. Using the Freeform Pen tool, draw a heart and use the control points and anchor points to adjust it till you are happy with its proportions and lines. (If you find this difficult, you may wish to work through "Heart 2" first.)
Choose a name for your file and File -> Save As ..
|
 |
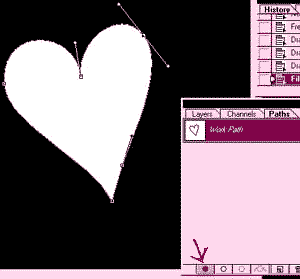
| c. Now you are going to fill your heart with joy and laughter. .. Well actually, you will be filling it with white. Be sure that you have white for the top color on your color picker squares. Click the paths palette and then down at the bottom of that palette, click on the Fill Path icon.
d. You are done with this path so while you are in the paths palette, drag the path to the trash can there at the bottom. :)
|
 |
| e. Return to the channels palette. Duplicate this Alpha Channel you just made by dragging it to the new channel icon at the bottom of the palette.
f. With Alpha Channel 2 selected, double click it and name it "Texture".
Filter -> Blur -> Gaussian Blur. (I used a setting of 20 pixels.)
Ctrl-S to Save.
|
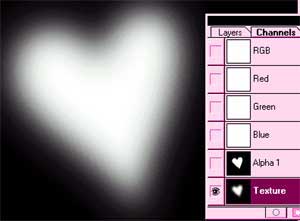 |
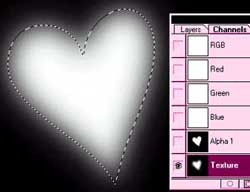
| g. Ctrl-click on Alpha 1 while you still have the Texture channel selected. This sends marching ants around through the blur of the Texture channel.
|
 |
|
h. Select -> Inverse -> and hit the Delete key. Ctrl-D to Deselect. Now your texture channel is trimmed so that it looks rather like a heart-shaped fluorescent light bulb.
Ctrl-S to Save.
|
 |
| 2. Next we will render the Texture Channel onto a layer of red using lighting effects.
a. Click Layers to go to the Layers palette. Click the New Layer icon at the bottom and then click the new layer to select it.
b. Choose a color and then alt-backspace to fill your layer with it.
c. Now this part is cool. Filter -> Render -> Lighting effects. In the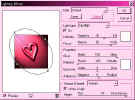 dialog box at the bottom it says Texture Channel. Choose your Texture Channel from the drop-down box . Then shine the light around from different directions. Experiment with different settings for mountainous and for materials, etc. Have some fun here. Once you find a setting you like, click OK. dialog box at the bottom it says Texture Channel. Choose your Texture Channel from the drop-down box . Then shine the light around from different directions. Experiment with different settings for mountainous and for materials, etc. Have some fun here. Once you find a setting you like, click OK.
File -> Save.
d. Notice the contour lines that appear in the first heart to the right. This is from the effects of the Gaussian blurring in the texture channel, but i don't like them. To get rid of them, Filter -> Blur -> Gaussian Blur just till they go away.
e. Trim the heart. Click on the channels palette and Ctrl-click the Alpha 1 channel. Select -> Inverse -> Delete. Ctrl-D to Deselect. Gloat for a moment about how cool this is.
Ctrl-S to Save.
|


|
|
3. We could leave the heart as it is, since it is pretty cool already, but I'm going to make a gold rim around the outside of it. We'll make an Alpha channel with the rim's shape and another with a texture and then make a 3D effect as we did with the heart.
a. Return to the Channels palette. Ctrl-click on the Alpha 1 channel in the channels palette to activate marching ants.
b. Enlarge the selection. Select -> Modify -> Expand ... about 10 pixels. Now we have a larger heart shape selected. The problem is that we just want the border. Look at the picture and see if you can figure out how to get just the border to be selected as i have to the right.
|
 |
c. Need a hint? Ok, you are subtracting the center part from the selection.
(Hold Alt as you select the center part to subtract it. How can you best select the center part? I like the magic wand for this, since you are dealing with an all-white shape, so what i did was to choose the magic wand, then hold Alt as i clicked the white heart shape.)
|
Tip: To ADD to a selection, hold Shift and select the next part. To SUBTRACT from a selection, hold Alt as you select the next part.
|
|
Digression:
Subtracting from (or adding to) selections is a good way to get a really complex selection, or even something simple like a crescent moon. Big circle - intersecting BIGGER circle = crescent!
|
  |
|
Ok.. back to the heart!
d. Now that you have the part that is between the marching ants paths selected, let's make this selection into a channel of its own.
e. In the Channels palette, click the new channel icon to make a new channel. You should have marching ants running around in the shape of the border that you are going to have around your heart.
f. Your foreground color should be white. Alt-backspace to fill the heart border with white in your Alpha channel. Double-click the channel in the palette and name it "Border."
Ctrl-S to Save.
|
 |
|
g. Try to do this step without looking up to the previous steps. Duplicate the channel. Now you could blur it as you did with the heart above, then trim it as you did above, but I am going to do the border a little differently.
h. With the white border still selected, Filter -> Noise -> Add Noise. Choose an amount of noise and then Filter -> Brush Strokes -> Angled Strokes. (You can do ANY sort of texture you want to. Sky is the limit!) Name your textured border channel "Border Texture." Ctrl-D to Deselect.
Ctrl-S to Save.
4. Now let's make this border into gold!
a. Return to the layers palette and make a new layer by clicking the new layer icon. Fill this layer with a medium tan color (In the # field of your color picker, type in BEAD90 for the exact patented myjanee gold color that i used for this gold rim.)
b. Filter -> Render -> Lighting Effects and use similar settings as before to render your border.
c. Trim this gold heart as follows: Return to the Channels palette and Ctrl-click the Alpha channel with the plain rim. Return now to the Layers palette and click on the gold layer in the palette to activate it.
Select -> Inverse -> Delete to trim your border. Ctrl-D to deselect.
d. Call someone in to show them how cool this is. Then Ctrl-S to Save.
|
 |
| 5. Add some layer effects. Since you have the border and the heart in two separate layers, you can do different things to the layers. Also, you have the Alpha channels for both of them, so you can use these to your advantage too.
I added a layer below the heart where i made the red glow. I added another layer above the heart where i did some additional shading with black, red, and white. I trimmed the excess using the selection from Alpha 1.
6. When you decide that you want to save this file as a jpeg, first ctrl-s to save all your layers and channels intact in your .psd file. Then choose File -> Save a Copy (In version 6, use File -> Save as.. or File -> Save for Web.) and then pick a new filename and format for your picture.
This will automatically merge the visible layers and toss out (for this file only) the channels. It doesn't alter your .psd file though, in case you want to go back and work with it more later!
I hope you enjoyed this tutorial. If you encounter any seemingly insurmountable obstacles, or if you find an error that i've made, i appreciate your letting me know. Thank you!
|
 |
| 7. For an extra-special touch, put your initials or your beloved's name in the heart. Here's how.
a. Click on the Type Tool, click on your heart, and then, in the box that comes up, choose a font and size and then type whatever you want. Click OK. (In version 6, the Type tool is a bit different. You need to make sure that you have the Text Layer button pushed at the left of the options palette and not the Text Mask button. More on the Type tool in v. 6)
 b. Layer -> Effects -> Bevel/Emboss. I chose Pillow Emboss with depth and blur each set at 3 for the example at the left. b. Layer -> Effects -> Bevel/Emboss. I chose Pillow Emboss with depth and blur each set at 3 for the example at the left.
c. For the example at the right, I made a text layer and then dragged it below the heart layers, but above the shadow layer. I made the red layer of the heart so its opacity was 60% by moving the slider in the layers palette. Then i made another layer above the text layer for the ink lines which i did with the paintbrush.
|
 |
|

|
|
What can YOU think of to do with the hearts you make? Send me yours! :)
Here are some I've gotten from students:
|