 |
Website Interface with Rollovers
Part 6: Saving the interface for the web
|
 |
|
|
Ok, so at this point, if you've been following along, our fair maiden is now sliced and we've taken her to ImageReady.
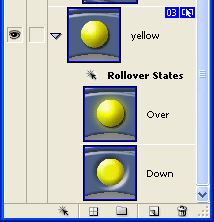
Now our rollover states are lined up in the Web Content palette. You should be able to see what each of your states looks like by turning on and off the visibility eyes there and looking at your image.
|
 |
1. Optimize your slices.
ImageReady enables us to save each of our slices in a different quality setting. This can help us in keeping our website lean, by minimizing the filesize of our less important images.
For example, in this interface, we might not care as much about the parts with the plainer colors, whilst we may want our site title to be clear and crisp.
Here's how to optimize a slice:
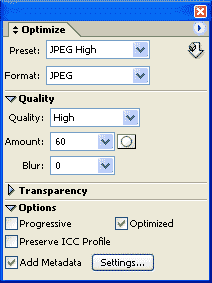
- In ImageReady, Click your first slice with the Slice Select tool.
- Make your Optimize palette visible, if it isn't already. (Window > Optimize)
- Have a look at the options. I have picked one of the buttons, and I want a high quality for this one.
|
 |
| Continue in this way, clicking and optimizing each of your slices. |
| TIP: If you're making a transparent interface, that is, one that you can put against a moving background or a pattern, you can make just the edges into transparent GIF's. Be sure to set the Matte color under Transparency.
For more on saving Transparent GIFs, see this tutorial:
|
|
2. Check your Output Settings.
If you're anything like me, you will not be likely to muck around in this much. But for this project, you'll want your Output Settings to read as mine do (default), so let's have a look and make sure that they are as they need to be. It really only SOUNDS scary:
|
| Tip: Rather than closing this box to get to the other different output setting choices, you can get to all of these other choices once you have the dialog box open, by using the dropdown below the Preset dropdown. See note on image below. |
|
- In ImageReady, go to File > Output Settings > Saving Files to start off. You'll see this extra-large dialog box which looks like mine just below.
- Check all these parameters. Note that your images will be put into a folder named, appropriately, "images," unless you specify otherwise.
- Have a look at how your files will be named. "Trigger name" refers to "normal," "over," or "down," the three different states that we're making. We don't have to change anything here; I just wanted you to check these to see how they are done.
|
|
|
3. Save it!
No sense in stalling further, we're ready!
File > Save Optimized as... and you'll get the almost completely familiar saving files dialog box, asking you where you want to put your beautiful files.
There is one crucial difference between this dialog and your regular saving dialogs, though, and this is something you have to check:
Be sure to check that you want BOTH the html AND the images to be saved! The html file will give you the coding to set up your table, and this can be very handy! Of course, if you just want your images, you don't have to save the html.
Pick a logical location for your html file and images (which will be in their own folder labeled images) and click OK.
|
|
|
4. Test it out in your browser
Before you install this into your webpage, test it out in your browser:
File > Open ... and then surf to the location where you put your files. Find the html file and click it. You should get a working version of your image!
Test out each of your buttons and be sure that it does what it ought to do. If something isn't right, you'll need to head back over to ImageReady to troubleshoot.
|
Great example of a Mystery Meat interface (something to avoid!)! Always label your buttons in some way, so that your user won't have to hover over them or click them to see where they go!
For my finished interface, I made numbers to label each button. These are on separate layers, above the button layers. All I had to do was go back to IR and Save Optimize as... It remembered all my settings.
|
5. Getting it into your website
I recommend dragging the whole folder, including both your html file and your images into your website's files. This makes it certain that both will go together, that the relative references to images will actually work.. you get the idea.
I'm not an html person, and I haven't studied javascript enough to know anything about it. So, for me, this is rather delicate code and, once you start changing relative references by leaving some of the files behind, you can end up with a mess.
Once you get the files into your web editor, you can either copy-paste the code to your page, or you can open the html file and copy-paste from the Layout view into your page. (This is what it's called in GoLive.)
|
6. Uploading, checking and tweaking
When you upload your file with your interface, you have to upload the script as well. In GoLive, this appears as a folder called Generated Items. It is in your main directory. If you peek into that folder, you'll see the script you need to upload and it's called "CSScriptLib.js."
Be sure to upload all of these:
- the Generated Items CSScriptLib.js file
- the HTML page upon which your interface appears
- the Images folder in which you have all your slices and rollover images
We'll always have to do some tweaking, just to keep us humble. So go on and hit the Preview button in your web editor, or upload if you're brave, and tweak as necessary.
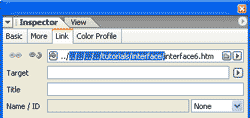
One tweak that I had to do was this: Remember when we filled in links back in Part 5, step 3? At this point, you'll have to change all of those links. They now refer, in my case, to ../../../../../tutorials/interface/...What's that?!
It's the relative location of the link to where we were before, that is, my hard drove Documents folder! Just delete all the ../ notations and you'll be there. (Again, this is what it is in GoLive. Your mileage will vary!)
|
 |
|
|
|
|
|
|
|
|
|
All material in this site is ©2001-2004 by myJanee.com Graphic Creations. No part of it may be used without my written permission. If you have questions or comments about this site or its construction, contact Janee at myJanee.com Graphic Creations, 7193 W Gifford Rd, Bloomington, Indiana, USA 47403 or by email.
|
|
|
|
|
![]()
![]()