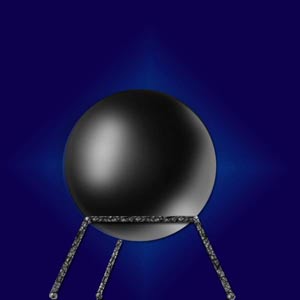
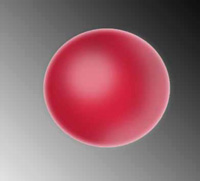
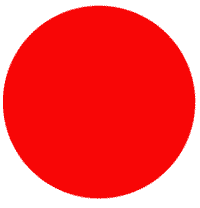
A Red Rubber Ball A Red Rubber Ball
Using the Airbrush in PS 7
In this tutorial you will work with the airbrush to create this red rubber ball! Along the way, you will learn these techniques as well:
- Making a circular selection
- Filling a selection
- Choosing a brush from the brushes palette
- Using the airbrush to shade and highlight.
- Using some keyboard shortcuts
- Making a linear gradient
- Cropping an image
- Saving for the web.
Though this tut was written with PS7, it can be worked with older versions. The brushes palette is the only thing that will look different.
(I KNOW that this is not the fastest way to make a 3D ball, and it may well not be the best way. However, I do think that it is a good way to show you some ways to paint with your airbrush.)
|

This tutorial, written with beginners in mind, is part of the Painting with PS 7 series of tutorials. Though it stands on its own just fine, I hope you will have a look at the others too, especially if you like this one! Items in purple are linked to a more in-depth explanation of the subject.
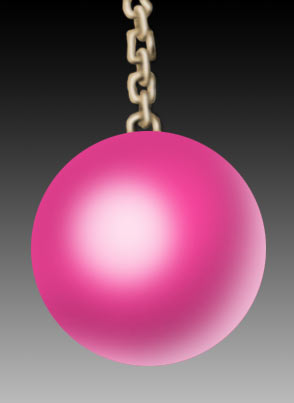
Other tutorials in this Painting collection:
 PS Painting 1, Brushes in PS 7 PS Painting 1, Brushes in PS 7
 Impressionist Heart Impressionist Heart
 Flowers Along a Path Flowers Along a Path
|
| We will begin by making a selection. We will fill the selection and then add the shading and highlighting. Finally, we will add the background.
So what are we waiting for? Grab your mouse or your pen, if you are using a graphics tablet.
1. a. File -> New and make your canvas as large as you can comfortably fit on your screen. Name the file something appropriate. 72 dpi is fine since this is for the web.
|
|
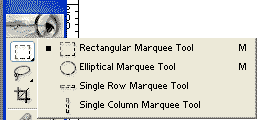
On the upper left corner of the toolbar are your marquee tools. If the rectangle one is showing, click and hold your mouse on it till the other tools are visible.
b. Choose the Elliptical Marquee.
Hold your shift key and drag out your circle. What does the shift key do? (Try this without Shift, to see.)
|
|
| Next, we will fill the selection with your favorite color, but we want to put this ball on a NEW LAYER. Notice that all we have is the background layer now. You COULD make your ball on that layer, but that will be extra work for you later when you want to ADD a background.
2. a. Click the New Layer icon at the bottom of the layers palette to make a new layer.
b. Choose your favorite color in the color picker and then hold alt and click backspace (alt-backspace) to fill your selection with your foreground color.
Leave your selection active for now.
File -> Save as... and choose an appropriate place to put your work. Leave it in psd format.
|
 |
|
|
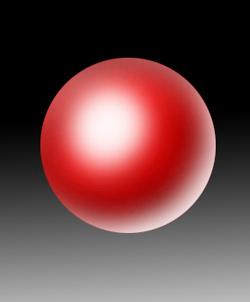
| Next, we will use the airbrush to apply some shading.
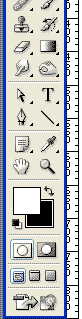
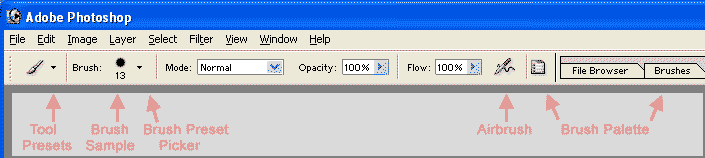
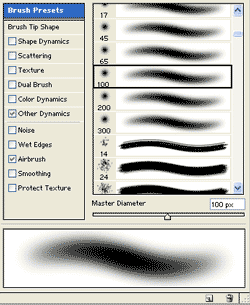
3. a. Choose your paintbrush tool in the toolbar (It might be under the pencil.) and then click on the Brushes Palette over to the right side of your options bar. Be sure that you are working in the Brush Presets as I am to the right.
b. Click on your Soft 100-pixel brush.
Notice that there are a couple of attributes already selected for this brush, Other Dynamics and Airbrush. These attributes, as checked, will give you a result similar to that in the thumbnail. You can change these too, without changing your preset permanently, but we will use this as it is for now.
|
 |
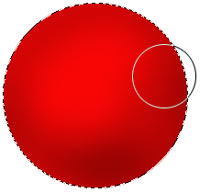
| Now to do the shading.
4. a. Make a new layer.
b. Type D on your keyboard to give yourself the Default colors.
c. Now on the brush options bar, type in a flow rate of 50% or so.
Also, especially if you are painting with a mouse or trackball, you will probably want to reduce your opacity as well.
d. With black as your foreground color, paint gently around the outside of your ball.
Ctrl-s to save.
|
|
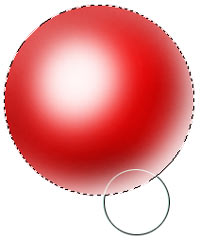
| Next let's do the highlighting.
5. a. Make another new layer (you should have 4 now.)
b. Type X to eXchange your foreground and background colors, bringing white to the foreground.
c. With the same brush, and the selection still active, do the two highlights, as I have done here.
For the outer highlight, have your brush positioned as mine is, so that the edging of the brush forms your highlight. This enables you to make it subtler and thicker toward the outside.
|
 |
|
If you don't like the look of either the shading layer or the highlight layer at this point, just turn off the eye for that layer, make a new one, and do it again.
It does take a bit of practice to gain facility with the airbrush for this sort of work. Keep in mind that if it were easy, everyone would be doing it. Take your time though and work it over a few times till you like your result!
|
|
d. When you are all done with this, Ctrl-D to Deselect.
Ctrl-S to Save.
|
| 6. Now let's do the background. For this, I chose the gradient tool and then the linear gradient from the options bar. (The gradient tool might be hidden under your paint bucket! In any case, it is the 2nd one below the paintbrush.)
a. Click on your Background layer in your layers palette, because you are going to do your gradient on that.
b. Drag your gradient from the bottom of the canvas to the top. If you want it to go straight up, hold the shift key. You will notice that the shift key tends to keep things straight and even. :)
Ctrl-S to Save.
At this point, if you want to save this to turn in to your instructor or to put on your site, you will want to crop the image first. The crop tool is the 3rd down on the left and works much like the marquee tools, except that you can adjust the boundaries with the handles. When you get this the way you want it, click the Enter key.
Then click File -> Save for Web. Choose jpg for your format. Click the image size tab and reduce your image to the size you want. Then set it to a quality setting that makes your file a reasonable size without sacrificing too much quality. For more on saving for the web, see this tutorial.
|
|
| I hope you enjoyed this tutorial and that you learned some things about painting with the airbrush!

For more on using the painting tools in Photoshop 7, see
PS Painting 1, Brushes in PS 7
 A Red Rubber Ball A Red Rubber Ball
Impressionist Heart
Flowers Along a Path
|
|
|
|
|
RETURN to Janee's Archive Tutorial Index
Ask tutorial questions in the Message Board or feel free to email me!

|
| All material in this site is ©2001-2002 by myJanee.com Graphic Creations. No part of it may be used without my written permission. If you have questions or comments about this site or its construction, contact Janee at myJanee.com Graphic Creations by email. |
|
|
|