 Tilings 3 -- Hexagonal "Beehive" Tilings Tilings 3 -- Hexagonal "Beehive" Tilings
In this third section of the Tiling tutorial series, we will work with hexagonal tiles!
Here, we will take an image and make it into a seamless tiling, that is, so that we can't tell where the pieces join together. In this way, you can make an endlessly repeating tiling for a background for artwork, for a website background, etc..
What's different about this one, though, is that we will be working with a hexagonal shape, not just a rectangle. Once you have worked through and understand the methods here, you should be able to figure out how to do a tiling with diamonds or triangles, too! For precision here, we need to use guidelines and exact angles. If you just "eyeball it," you are not as likely to get good results.
|


This tutorial was written with Photoshop 7, but it will work just great with earlier versions, and with Elements, too!
As you work through this tutorial you will learn or review these techniques:
- Using Guidelines
- Using the Shape tool
- Transforming by rotation
- Defining a pattern.
- Filling an area with a pattern.
|
| Tip: Do you find yourself often wanting to find the center of your canvas? Click this icon for a short tutorial on making an ACTION which positions guidelines in the exact center for you!
|
1. Make your first hexagon.
- Make a new layer, by clicking the Create a New Layer icon at the bottom of the Layers palette.
- Choose a color and your Polygonal Shape tool. Choose 6 for the number of sides. Use the Fill Pixels option.
- Drag guidelines to the approximate center of your canvas as shown here.
- Click and drag horizontally, beginning on this center point, and after you begin to drag, hold Shift as you bring out your hexagon.
Polygons will be centered where you begin the drag. Shift constrains your polygon's positioning to 45° angles. Release your mouse-drag BEFORE releasing the Shift key.
- I chose to embellish my hexagon with a white dot in the middle, but you don't need to do that. ;)
- If you do much embellishment at all, or if you think it prudent, File > Save as... name the file, and put it somewhere where you can find it.
|
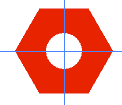 |
|
Tip: I chose to embellish my hexagon with a white circle in the middle. To make a circle centered, hold Alt and Shift as you drag from the center.
|
2. Make and position your second hexagon.
- Drag the hexagon layer down to the Create a New Layer icon to duplicate it.
|
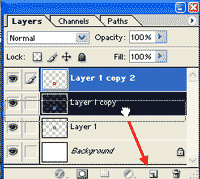 |
- Type V for the moVe tool and, holding Shift to constrain your drag to 45° intervals, drag your hexagon down below your first one.
- You do not have to leave a gap, and you can even overlap the hexagons.
|
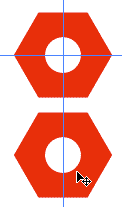 |
|
3. Make and position your third hexagon. (Do I sense a pattern developing in these directions?)
What we are going to do here is to exploit the mathematics that Photoshop has built in. The third hex needs to be the same distance from the first one, and needs to be rotated about the center of the first hexagon. Urf! That sounds complicated. It will make more sense if you just do it!
- Drag that second hexagon down to the New Layer icon. This duplicates it to make the third hexagon.
- Ctrl-T to bring up the Free Transform bounding box.
Now.. if we were to just rotate this hexagon, it would rotate about its own center, but that isn't what we want to do. We want it to rotate about the center of the FIRST hexagon!
- So.. see that spot in the middle of the bounding box? Click and drag that spot up to the center of the first hexagon.
- Now hold Shift and rotate the 3rd hexagon! Cool, eh?
|
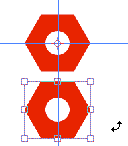
|
Holding Shift constrains your rotation to 15° intervals, so give it 4 jerks of rotation and you will have it where you need it!
(If you want, instead of dragging for 4 jerks, you can also type in 60° in the Transform Options bar at the top.)
Hit the Enter key to complete the transformation.
|
 |
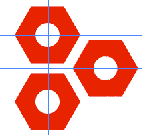
With the 3rd hexagon still chosen in the Layers palette, drag a guideline down from the top ruler so that it goes through the center of the 3rd hexagon. Then drag another vertically through its center.
If the guide does not snap easily into place, go to View > Snap To.. and be sure Guides is checked.
|
|
4. Make and position your fourth hexagon. (You will be pleased to note that this is the last one that you have to manually place.)
- Repeat what you did with the third hexagon, copying the 2nd one again, moving its center, and rotating it the other direction.
|
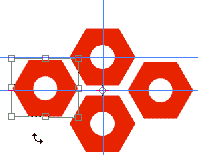 |
- Drag a guide out from the left-hand ruler till it snaps into place in the center of the fourth hexagon.
- Check to see that your guides look like mine to the right.
Define the Pattern.
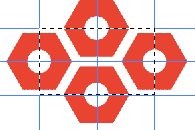
- Type M to bring up the Rectangular Marquee tool, or grab it from the Toolbox.
- Using the guides you have so conveniently placed, drag your rectangular marquee into that rectangle.
|
 |
- If you do not want the background to be in the pattern, turn off its visibility eye now.
- Edit > Define Pattern. Give it a clever name. Ctrl-D to Deselect.
- Now test your pattern! Make a new layer. Edit > Fill > Pattern... and choose your new pattern. It should be at the bottom of the choices.
|
 |
Tip: Now and then, Define Pattern is grayed out. I am not really sure why this is, but here are some things to try if it is.
- Be sure that you are on a VISIBLE layer.
- Choose the move tool. (Don't ask me; it just sometimes works.)
- Save your file, close Photoshop, and then reopen it.
|
|
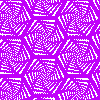
Here's my tile in use!

Another example:
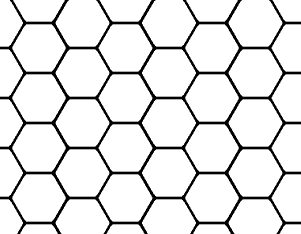
And more!
I mentioned diamond tiles. Here is a graphical depiction of the process with a diamond tile. Once you get the guides in there, tiles 3 and 4 just fall into place!
For the first tile, I began with just a single diamond and then added the other 3 as above. At that time i drew the flowers in the four sections. This looks a bit like '80's wallpaper, in case that's a look you're going for.
|
|
I hope you enjoyed this tutorial!

|
Want more pattern tutorials?
   
|